Softsystemware: 11/01/2009 - 12/01/2009

Friday, November 13, 2009

Boost Up Browsing Speed

      Are you feeling bore with your Internet surfing? Have you tried a number of Web Browsers to get rid of the slow internet speed, but not satisfied?

      Here we will go through some easy steps to speed up you Firefox (i.e., Mozilla Firefox) with the pictures of each steps which can make your work more easy to speed up your surfing using Mozilla Firefox and overcome the slow internet speed.


  • Step 1: Start Firefox and type "about:config" (within the quotes) in the address bar. Then press "Enter"..
  • Step 2: A confirmation dialog box will appear and confirm this.


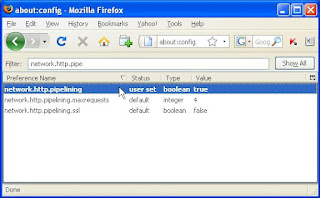
  • Step 3: Then type "network.http.pipe" (within the quotes) in the Filter Search Box (located at the top of the window).


  • Step 4: Now double click on the string "network.http.pipelining" and the value of the string will change to "True".

    • Note:
      If you are using a proxy, set the "network.http.proxy.pipelining" to true as well.


  • Step 5: Then double click on the string "network.http.pipelining.maxrequests" and enter 35 as the integer value of this string.


  • Step 6: Now right click on the blank space on the Configuration screen and select "New" and then "Boolean".


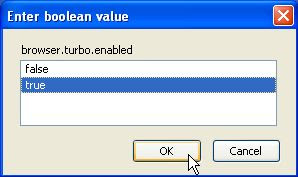
  • Step 7: As the new Boolean Name enter "browser.turbo.enabled" and confirm it by clicking "OK".


  • Step 8: Last of all set "true" as the value of the Boolean.


Note:

You can also use plug-in called Fasterfox (http://fasterfox.mozdev.org) which can help you to boost up your Firefox browsing speed.

Registration and Support - Quick Screenshot Maker

Registration Benefits


  • The trial version is for evaluation purpose only. If you think the software is useful to you and you want to keep it, you should register it. For trial version, there is functionality limited for saving. you can save 30 captures only. If you have captured and saved 30 captures, you can not save anymore. For registered version, there is no functionality limited.

  • If you buy !Quick Screenshot Maker, you will enjoy the following main services:
    The registration code will be sent to you automatically in a short time. Usually not more than 1 hour.

  • If we have updated our products, we'll inform you as soon as possible. You can get free upgrades for the small upgrades.

  • Whenever you encounter technical problems, our engineers will be available for help. Technical support is totally free too.

How to Register


  • After you purchase Quick Screenshot Maker online, you will receive a confirm email with registration code in it soon.

  • Start Quick Screenshot Maker. Click the "Help > Register..." menu item, and the registration dialog will appear. Enter your registration name and code as you received in the edit box. Click "OK" button. If successful, you will become a registered user of Quick Screenshot Maker.

  • If you have any question or met any problem on ordering, please contact sales@etrusoft.com

Contact Website and E-mail IDs


  • For technical support contact directly, E-mail:
    support@etrusoft.com

  • If you encounter a bug in the product, or you have any comments, please report it by sending an e-mail:
    comments@etrusoft.com

  • If you have any problems about ordering the product, or you do not get your registration code in a timely manner or if you've lost it, please let them know. Please include your name, address, email address, and order confirmation number (if you have it). They are always glad to help you:
    sales@etrusoft.com

  • To get support by phone or fax, you can use the information below:
    Phone (US and Canada): 888-447-1175
    Phone (International): 801-444-2837
    Fax: 801-497-9456

Quick Screenshot Maker

Overview


      Quick Screenshot Maker is an all-in-one tool for screen capturing, image editing and organization. It can capture any part of the screen precisely in flexible ways, including DirectX, screen saver and movie screens. Use Quick Screenshot Maker to save time and enhance your screen shots. Add annotations, text, arrows, highlights, clipart and more. The History Bar helps you find all of your captured images and organize them quickly and easily.

Key features


  • Powerful screen capture functions ::-
    Use Quick Screenshot Maker to capture full screen, active window, windows and controls, regions images from your screen, including DirectX, screen saver and movie screens. Can capture cursor image, supports auto-scroll long window during window capture. Also it supports time-activated capture.

  • High productivity ::-
    Quick Screenshot Maker supports hotkey to start capture quickly. You can define you own hotkey. Can capture an image and copy it to the clipboard or save it to graphic file with automatically generated file names.

  • Easy viewing and editing ::-
    You can view screen shots by zooming, hand-scrolling. Edit an image directly - by high quality resizing, rotating, flipping and cropping. You can pick a color to make part of an image transparent. Change the opacity of image. And you can add as many as 40 kinds of effects to an image, such as dropping shadow, changing brightness & contrast, halftone, blur, mosaic... and so on.

  • Enhance the screen shots ::-
    Quick Screenshot Maker allows you to edit several screen shots on the same canvas. And you can improve the images by adding objects like arrows, text, balloons (callouts), shapes (highlights) and other images. You can move, resize, change properties of the objects, or remove the useless ones at any time.

  • Capture Management ::-
    All the files saved by Quick Screenshot Maker are recorded in the History bar. It shows the file names, path, saved time and size of each file. You can quickly open or insert an image file to current canvas by simply double clicking a history link. Delete the files or links from the History bar, too. And you can also add some links to the list.

Note:
You can download and distribute the fully functional unlicensed copy. Quick Screenshot Maker is shareware.

Tuesday, November 10, 2009

Enable Hibernation in Windows XP

Want to Hibernate your computer? Are you confused between "Stand by" and "Hibernate"?

Hi...

      Stand by is a method in which all data in RAM (Random Access Memory) does not copied anywhere. When the computer starts from Stand by then the system automatically starts from the last position when you stand by. But in case of hibernating all data of RAM is copied to Secondary Memory (i.e., Hard Disk) and when you Turns your computer on then all those data is again copied into RAM, that's why all the windows, programs, games remain in the same state where you left those.

      Another main difference between Stand by and hibernation is that in stand by your computer remain turns on but not in the hibernation state and so hibernate state is a good method for power saving.

Now the question arises that how to enable Hibernation and can you enable Hibernate your computer in any state?

      The second answar is that you can Hibernate your computer in any state if your Mother Board suports Hibernation and you install properly VGA Driver.

      Then we come to the topic how can you enable Hibernation in your computer. The following steps will help you to enable Hibernation:

Step 1: Go to Start -> Control panel ->Power Options (in Classic View) or Performance and Maintenance and then Power Options (in Category View).


Step 2: Now a "Power Options Properties" window appear. Go to "Hibernate" tab.


Step 3: After that check mark the box "Enable hibernation".


Step 4: Click "Apply" and "Ok".


Step 5: Now when you want to hibernate then go to "Start" -> "Turn off Computer" and pressing the Shift key you can find that "Stand by" button will turn into "Hibernate" button.

Monday, November 9, 2009

Get Rid of Security Alert Message in Windows XP

How can you get rid of the Security Alert


"Your computer might be at risk"


Hi guys, often we feel bore due to different types of alerting messages, like Windows Security Alert Message, Low Disk Space Message etc. Here I am going to tell you the way to get rid of the "Windows Security Alert Message".


Often you find that a message from windows security alert stays in your system tray and pop-up in your program(s) and you feel boring. Here I am giving an idea to stop alerting for "Windows Firewall", "Automatic Update" and "Antivirus".


: The Way to get rid of the alert message ::


Go to "Start" -> "Control panel" ->"Security Center". A pop-up window will come, looks like this:-


In this window, click on the option "Change the way Security Center alerts me" in the left side panel named "Resources". The pictures may help you to get the right thing.


Now a pop-up option window named "Alert Setting" will appear (see picture). Here you have to uncheck the check boxes for which you dont want to receive the alert message.

How to clear Page File in Windows XP

Clear Page file on shutdown in Windows XP


"Page File" is a system utility which is used to store data of RAM onto Hard Disc when necessary. It is done by operating system. It is an automated utility provided by operating system to run your computer when the usage of RAM exceeded, when you hibernate your computer etc. The necessary data is stored in a file and is read by the operating system when necessary.

If you clear the Page File on shutdown your computer, then whenever you start again, the mapping of your RAM onto Hard Disc will be easy by your OS and it will be a fresh copy. To clear the Page File on shutdown you just need to follow the steps described below (also follow the screenshots):


Go to "Start" -> "Control Panel" -> "Administrative tools" -> "Local Security Policy" -> "Local Policies" ->Security Options.


Now double click on the option "Shutdown: Clear Virtual Memory Pagefile" and check the option "Enable". Then click "Apply" and then "Ok".

Sunday, November 1, 2009

How to add "MoveTo" in Right Click


::  Add "Move To" Option in Right Click Context Menu  ::


  •  Click Start -> Run -> Type "regedit" (without quatation) ->Press "Enter".
  •  Now go to HKEY_CLASSES_ROOT ->AllFilesystemObjects -> shellex -> ContextMenuHandlers.


  •  Right click on it and keep your mouse cursor "New" -> "key". Left Click on it and type "MoveTo" (withou quatation). Now in the right panel double click on "(Default)" and copy and paste the value {C2FBB631-2971-11D1-A18C-00C04FD75D13}. Now click "OK" and close the Registry Editor.

You can see a video which will help you :


http://www.youtube.com/watch?v=HaWvlV88kzE

Registry Editor in Windows XP

Do you ant to edit your system registry?


   It is esay, But be careful, any wrong value insertion or deletion may harm to your operating system.
  • To edit system registry:
    • Start  -> Run  -> regedit  -> Press Enter