Softsystemware: 2009

Friday, November 13, 2009

Boost Up Browsing Speed

      Are you feeling bore with your Internet surfing? Have you tried a number of Web Browsers to get rid of the slow internet speed, but not satisfied?

      Here we will go through some easy steps to speed up you Firefox (i.e., Mozilla Firefox) with the pictures of each steps which can make your work more easy to speed up your surfing using Mozilla Firefox and overcome the slow internet speed.

  • Step 1: Start Firefox and type "about:config" (within the quotes) in the address bar. Then press "Enter"..
  • Step 2: A confirmation dialog box will appear and confirm this.


  • Step 3: Then type "network.http.pipe" (within the quotes) in the Filter Search Box (located at the top of the window).


  • Step 4: Now double click on the string "network.http.pipelining" and the value of the string will change to "True".

    • Note:
      If you are using a proxy, set the "network.http.proxy.pipelining" to true as well.
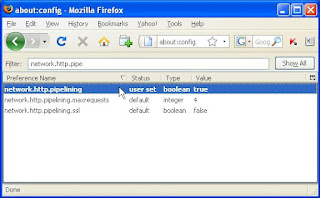


  • Step 5: Then double click on the string "network.http.pipelining.maxrequests" and enter 35 as the integer value of this string.


  • Step 6: Now right click on the blank space on the Configuration screen and select "New" and then "Boolean".


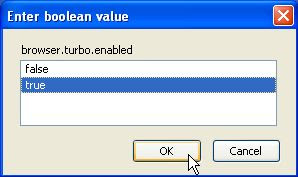
  • Step 7: As the new Boolean Name enter "browser.turbo.enabled" and confirm it by clicking "OK".


  • Step 8: Last of all set "true" as the value of the Boolean.


Note:

You can also use plug-in called Fasterfox (http://fasterfox.mozdev.org) which can help you to boost up your Firefox browsing speed.

Registration and Support - Quick Screenshot Maker

Registration Benefits


  • The trial version is for evaluation purpose only. If you think the software is useful to you and you want to keep it, you should register it. For trial version, there is functionality limited for saving. you can save 30 captures only. If you have captured and saved 30 captures, you can not save anymore. For registered version, there is no functionality limited.

  • If you buy !Quick Screenshot Maker, you will enjoy the following main services:
    The registration code will be sent to you automatically in a short time. Usually not more than 1 hour.

  • If we have updated our products, we'll inform you as soon as possible. You can get free upgrades for the small upgrades.

  • Whenever you encounter technical problems, our engineers will be available for help. Technical support is totally free too.

How to Register


  • After you purchase Quick Screenshot Maker online, you will receive a confirm email with registration code in it soon.

  • Start Quick Screenshot Maker. Click the "Help > Register..." menu item, and the registration dialog will appear. Enter your registration name and code as you received in the edit box. Click "OK" button. If successful, you will become a registered user of Quick Screenshot Maker.

  • If you have any question or met any problem on ordering, please contact sales@etrusoft.com

Contact Website and E-mail IDs


  • For technical support contact directly, E-mail:
    support@etrusoft.com

  • If you encounter a bug in the product, or you have any comments, please report it by sending an e-mail:
    comments@etrusoft.com

  • If you have any problems about ordering the product, or you do not get your registration code in a timely manner or if you've lost it, please let them know. Please include your name, address, email address, and order confirmation number (if you have it). They are always glad to help you:
    sales@etrusoft.com

  • To get support by phone or fax, you can use the information below:
    Phone (US and Canada): 888-447-1175
    Phone (International): 801-444-2837
    Fax: 801-497-9456

Quick Screenshot Maker

Overview


      Quick Screenshot Maker is an all-in-one tool for screen capturing, image editing and organization. It can capture any part of the screen precisely in flexible ways, including DirectX, screen saver and movie screens. Use Quick Screenshot Maker to save time and enhance your screen shots. Add annotations, text, arrows, highlights, clipart and more. The History Bar helps you find all of your captured images and organize them quickly and easily.

Key features


  • Powerful screen capture functions ::-
    Use Quick Screenshot Maker to capture full screen, active window, windows and controls, regions images from your screen, including DirectX, screen saver and movie screens. Can capture cursor image, supports auto-scroll long window during window capture. Also it supports time-activated capture.

  • High productivity ::-
    Quick Screenshot Maker supports hotkey to start capture quickly. You can define you own hotkey. Can capture an image and copy it to the clipboard or save it to graphic file with automatically generated file names.

  • Easy viewing and editing ::-
    You can view screen shots by zooming, hand-scrolling. Edit an image directly - by high quality resizing, rotating, flipping and cropping. You can pick a color to make part of an image transparent. Change the opacity of image. And you can add as many as 40 kinds of effects to an image, such as dropping shadow, changing brightness & contrast, halftone, blur, mosaic... and so on.

  • Enhance the screen shots ::-
    Quick Screenshot Maker allows you to edit several screen shots on the same canvas. And you can improve the images by adding objects like arrows, text, balloons (callouts), shapes (highlights) and other images. You can move, resize, change properties of the objects, or remove the useless ones at any time.

  • Capture Management ::-
    All the files saved by Quick Screenshot Maker are recorded in the History bar. It shows the file names, path, saved time and size of each file. You can quickly open or insert an image file to current canvas by simply double clicking a history link. Delete the files or links from the History bar, too. And you can also add some links to the list.

Note:
You can download and distribute the fully functional unlicensed copy. Quick Screenshot Maker is shareware.

Tuesday, November 10, 2009

Enable Hibernation in Windows XP

Want to Hibernate your computer? Are you confused between "Stand by" and "Hibernate"?

Hi...

      Stand by is a method in which all data in RAM (Random Access Memory) does not copied anywhere. When the computer starts from Stand by then the system automatically starts from the last position when you stand by. But in case of hibernating all data of RAM is copied to Secondary Memory (i.e., Hard Disk) and when you Turns your computer on then all those data is again copied into RAM, that's why all the windows, programs, games remain in the same state where you left those.

      Another main difference between Stand by and hibernation is that in stand by your computer remain turns on but not in the hibernation state and so hibernate state is a good method for power saving.

Now the question arises that how to enable Hibernation and can you enable Hibernate your computer in any state?

      The second answar is that you can Hibernate your computer in any state if your Mother Board suports Hibernation and you install properly VGA Driver.

      Then we come to the topic how can you enable Hibernation in your computer. The following steps will help you to enable Hibernation:

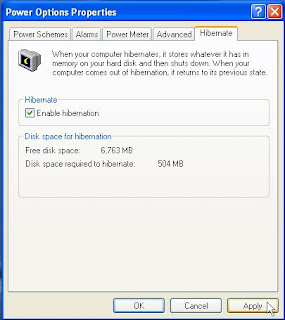
Step 1: Go to Start -> Control panel ->Power Options (in Classic View) or Performance and Maintenance and then Power Options (in Category View).


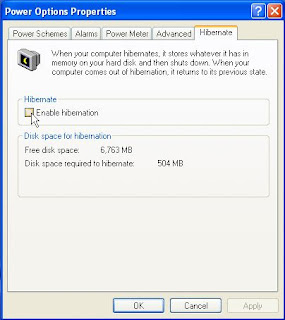
Step 2: Now a "Power Options Properties" window appear. Go to "Hibernate" tab.


Step 3: After that check mark the box "Enable hibernation".


Step 4: Click "Apply" and "Ok".


Step 5: Now when you want to hibernate then go to "Start" -> "Turn off Computer" and pressing the Shift key you can find that "Stand by" button will turn into "Hibernate" button.

Monday, November 9, 2009

Get Rid of Security Alert Message in Windows XP

How can you get rid of the Security Alert


"Your computer might be at risk"


Hi guys, often we feel bore due to different types of alerting messages, like Windows Security Alert Message, Low Disk Space Message etc. Here I am going to tell you the way to get rid of the "Windows Security Alert Message".


Often you find that a message from windows security alert stays in your system tray and pop-up in your program(s) and you feel boring. Here I am giving an idea to stop alerting for "Windows Firewall", "Automatic Update" and "Antivirus".


: The Way to get rid of the alert message ::


Go to "Start" -> "Control panel" ->"Security Center". A pop-up window will come, looks like this:-


In this window, click on the option "Change the way Security Center alerts me" in the left side panel named "Resources". The pictures may help you to get the right thing.


Now a pop-up option window named "Alert Setting" will appear (see picture). Here you have to uncheck the check boxes for which you dont want to receive the alert message.

How to clear Page File in Windows XP

Clear Page file on shutdown in Windows XP


"Page File" is a system utility which is used to store data of RAM onto Hard Disc when necessary. It is done by operating system. It is an automated utility provided by operating system to run your computer when the usage of RAM exceeded, when you hibernate your computer etc. The necessary data is stored in a file and is read by the operating system when necessary.

If you clear the Page File on shutdown your computer, then whenever you start again, the mapping of your RAM onto Hard Disc will be easy by your OS and it will be a fresh copy. To clear the Page File on shutdown you just need to follow the steps described below (also follow the screenshots):


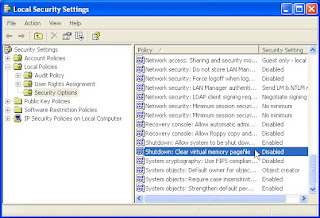
Go to "Start" -> "Control Panel" -> "Administrative tools" -> "Local Security Policy" -> "Local Policies" ->Security Options.


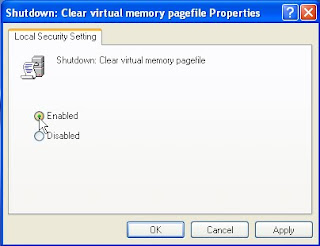
Now double click on the option "Shutdown: Clear Virtual Memory Pagefile" and check the option "Enable". Then click "Apply" and then "Ok".

Sunday, November 1, 2009

How to add "MoveTo" in Right Click


::  Add "Move To" Option in Right Click Context Menu  ::


  •  Click Start -> Run -> Type "regedit" (without quatation) ->Press "Enter".
  •  Now go to HKEY_CLASSES_ROOT ->AllFilesystemObjects -> shellex -> ContextMenuHandlers.


  •  Right click on it and keep your mouse cursor "New" -> "key". Left Click on it and type "MoveTo" (withou quatation). Now in the right panel double click on "(Default)" and copy and paste the value {C2FBB631-2971-11D1-A18C-00C04FD75D13}. Now click "OK" and close the Registry Editor.

You can see a video which will help you :


http://www.youtube.com/watch?v=HaWvlV88kzE

Registry Editor in Windows XP

Do you ant to edit your system registry?


   It is esay, But be careful, any wrong value insertion or deletion may harm to your operating system.
  • To edit system registry:
    • Start  -> Run  -> regedit  -> Press Enter

Thursday, October 29, 2009

DFX Audio Enhancer - DSP Technology

      DFX dramatically improves the sound quality of Internet and digital audio. Whether you're listening to downloaded audio tracks or live Internet radio streams, DFX will greatly enhance your listening experience.

  • - DSP technology behind DFX -

    •    DFX was the first plug-in to make truly professional-quality audio processing available to Internet audio users. DFX was developed by Power Technology, a company with vast experience in DSP based audio processing. Power Technology's professional audio products have won multiple awards from leading professional audio publications, and this high level of audio algorithm expertise was used to create the DFX plug-in.

    •    DFX enhances Internet-oriented audio listening experiences by correcting for the sonic limitations of nearly all the popular data compressed Internet audio formats. Data compressed audio suffers from two major problems: loss of high frequency fidelity and loss of stereo separation and depth.

    •    DFX compensates for the loss of high frequency fidelity by carefully regenerating the missing high frequency harmonics in the audio. DFX then compensates for the reduced stereo imaging and depth by carefully generating ambience and stereo depth.

    •    An additional factor limiting the quality of Internet audio playback is the use of speakers that are narrowly spaced and located close to the listener's ears. These location constraints reduce the perceived stereo field and reduce the natural room ambience which is important to good sounding audio.

    •    In addition to compensating for reduced stereo depth in the audio source, DFX's added ambience and imaging works particularly well in correcting for these limitations of closely spaced and located speakers.

    •    Typical PC-based multimedia playback systems and even home stereo playback systems also suffer from limited dynamic range and headroom. DFX compensates for this limited headroom by carefully processing the audio to increase the perceived loudness of the audio without altering the perceived dynamic range. This can dramatically increase the undistorted playback level available when listening to MP3 and other streaming audio files.

    •    DFX performs all audio processing with 32-bit floating point precision, yielding truly professional audio quality. Since Internet audio playback systems currently only support 16-bit audio playback, as a final processing step DFX carefully re-dithers the audio signal to the final 16-bit resolution using Power Technology's proprietary high quality dithering technology. Re-dithering allows a dynamic range in the playback signal that actually exceeds the theoretical limit of a 16-bit playback system.
  • Credits -
       Special thanks to Eleazar Ocbina for his skin creation "SoundFX" and R. Peter Clark for his skin creation "Obsidian".

Adjust your mouse in Windows XP

:: Teach Your Mouse - New Tricks ::


      Teach your mouse new tricks. Did you know you can change the speed at which your mouse pointer moves around the screen? Or switch the roles of the buttons to suit left-handed operation? Or even swap the arrow, hourglass, and other standard mouse pointers for different symbols - for example, dinosaurs? You can, and it's easy. With Windows XP, you have the mouse by the tail!

  • Adjust pointer speed -
    • Click Start, and then click Control Panel.
    • Click Appearance and Themes.
    • Under See Also, click Mouse Pointers.
    • On the Pointer Options tab, under Motion, drag the slider left to make the pointer move slower, or right to make the pointer move faster. If you choose a fast speed, make sure that the Enhance pointer precision check box is selected (this provides better control of the pointer when moving it at short distances), and then click OK.
      • If you're left-handed and you'd like your change your mouse to work the way you do, you can change the setting so your mouse is also left-handed. Here's how:


  • Make your mouse left-handed -
    • Click Start, and then click Control Panel.
    • Click Appearance and Themes.
    • Under See Also, click Mouse Pointers.
    • On the Buttons tab, under Button configuration, select the Switch primary and secondary buttons check box.
      Click OK.

  • Windows XP offers a lot of flexibility if you'd like to use a different mouse pointer. You can switch all your pointers at once, or you can switch them one a time.


  • Switch from standard mouse pointers -
    • Click Start, and then click Control Panel.
    • Click Appearance and Themes.
    • Under See Also, click Mouse Pointers.
    • On the Pointers tab, do one of the following:
      • Switch all of your pointers at once, in the Scheme list, click the scheme you want.
      • To change pointers one at a time, in the Customize list, click the pointers you want to change. After each selection, click Browse, click the pointer image you want to assign as a replacement (a preview of the image displays in the lower left-hand corner), and then click Open.
      • Click Apply and OK to complete the procedure.

Wednesday, October 28, 2009

Faster Startup Your Programs

Supercharge your startup:


      Want to keep your programs within easy reach? Windows XP lets you customize the Start menu and task bar so you can launch your favorite programs whenever you want them. No more searching for your favorite programs; you can easily pin, or assign, programs to the Start menu. Or you can use the Quick Launch bar as a way to keep other programs at your fingertips; ready to go at the click of the button.

      You can also place convenient shortcut icons on your desktop. Shortcut icons provide instant links to important files, folders, and other applications - even your printer and Internet connection - with a touch of your mouse.

      Here's how to pin a program to the Start menu. As an example, we'll pin the Windows XP Calculator program to the Start menu.
  • Pin Calculator to the Start menu

    • 1. Click Start, and then click All Programs.
    • 2. Click Accessories and point to Calculator.
    • 3. Right-click Calculator and click Pin to Start menu.
    • 4. Click anywhere on the desktop to quit the Start menu.
      That's all there is to it. The above works for any program on your computer, putting those programs on the Start menu until you decide to remove them. By the way, removing programs from the Start menu is even easier. Here's how:
  • Remove Calculator from the Start menu

    • Click Start, and then point to the program you want to remove (in this case, Calculator).
    • Right-click Calculator and click Unpin from Start menu.
    • Click anywhere on the desktop to quit the Start menu.
      If you have opened more than one program, you might like to display and use the Quick Launch bar. The Quick Launch bar makes it easy to access frequently used programs like Windows Media Player and your e-mail, and to open an Internet Explorer window. Windows XP loads several programs in the Quick Launch, including Show Desktop. One click on Show Desktop minimizes all the programs on your desktop.Another click restores them just as you'd left them.
  • Show Quick Launch on the taskbar -

    •  If the Quick Launch bar is not displayed, right-click an empty area on the taskbar and click Properties.
    •  On the Taskbar tab, under Taskbar appearance, select the Show Quick Launch check box and click OK.
    •  After Quick Launch is displayed, click Show Desktop to minimize all open programs.
      Another quick way to start your programs is to place a shortcut icon on the desktop. Here's how:
  • Place a shortcut icon on the desktop

    • Right-click Start, and then click Explore.
    • Locate the folder, file, or program in the Folders directory, and then click the item to open it.
    • Click the icon representing the item.
    • Click File on the toolbar, and then Create Shortcut on the drop-down menu that appears.
    • Right-click on the shortcut icon that is created.
    • Choose Send To from the drop-down menu, and then click Desktop (create shortcut) on the submenu that appears.

Add Sound Effects in Windows XP

Add sound effects :


  • 1. Click Start, and then click Control Panel.
  • 2. Click Sounds, Speech, and Audio Devices.
  • 3. Under Pick a task, click Change the sound scheme.
  • 4. On the Sounds tab, under Program events, click the event to which you want to apply a sound.
  • 5. In the Sounds list, click the sound you want to link to the event.
  • 6. To hear the sound, click the playbutton to the right of the Sounds list.If you are satisfied with your choice, click OK. Repeat steps 4 and 5 until you have linked sounds to as many program events as you want.
  • 7. To save your settings into a personalized sound scheme, click Save As.Type a name for the sound scheme, and then click OK.
  • 8. Click OK to complete the procedure and save your sound scheme.


    Note :


          While Windows XP contains many sound effects to choose from, you can create your own by copying them from other sources, such as CDs or the Internet, and storing them on your hard drive.

Customize your desktop background


Customize your desktop background :


      Click Start, and then click Control Panel ->Click Appearance and Themes ->Under Pick a task, click Change the desktop background ->On the Desktop tab, do one or more of the following:
  •  In the Color box, select a color.
  •  In the Background list, click a background picture.In the Position list, click Center, Tile, or Stretch to define how your picture will be displayed.
  •  Click Browse to search for a background picture in other folders or on other drives. You can use files with the following extensions: .bmp, .gif, .jpg, .dib, .png, or .htm. In the Position list, click Center, Tile, or Stretch to define how your picture will be displayed, and then click OK or Apply.
  •  If you want to use a picture from a Web site, on the site, right-click the image, and then click Set as Desktop Background.
  •  To see a colored background you must select none from the Background drop-down menu. Also, if you choose an .htm document as your background picture, the Position options are unavailable; instead, the .htm document automatically stretches to fill the entire background.

How to change screen resolution in Windows XP

  • Change your screen resolution -

       Increase your screen resolution to view more information at one time. Everything will appear smaller on your screen, including text.

       Decrease your screen resolution to increase the size of items on your screen. You will be able to view less information at one time, but text and other information will be larger.


  • To change your screen resolution -
    Open Display in Control Panel -> On the Settings tab, under Screen resolution, drag the slider, and then click Apply. ->When prompted to apply the settings, click OK. Your screen will turn black for a moment ->Once your screen resolution changes, you have 15 seconds to confirm the change ->Click Yes to confirm the change; click No or do nothing to revert to your previous setting.

  • Notes :
    •    To open Display, click Start, click Control Panel, and then double-click Display.
    •    A higher screen resolution reduces the size of items on your screen and increases the relative space on your desktop.
    •    You can switch your screen resolution temporarily to 640 X 480 if you have games or other programs that are set to run at that resolution. To switch, right-click the game or program (on the desktop or on the Start menu), and then click Properties.Click the Compatibility tab, and then select the Run in 640x480 screen resolution check box. Your display reverts to its default resolution when you close the program.
    •    Your monitor and video adapter determine how much you can change your screen resolution. You may not be able to increase the resolution above a certain level.
    •    Changes to screen resolution affect all users that log on to the computer.
    •    Only the recommended screen resolutions are listed. For additional settings, click the Advanced button on the Settings tab, click the Adapter tab, and then click List all Modes. Select the resolution, color level, and refresh rate you want.

USB Disk Security

  • Key features:

    • 1. USB Disk Security provides 100% protection against any threats via USB drive, however, the majority of other products are unable even to guarantee 90% protection.
    • 2. USB Disk Security is the best antivirus software to permanently protect offline computer without the need for signature updates, but other antivirus software should update signature database regularly, and they cannot effectively protect offline computer.
    • 3. This light and easy to use solution is 100% compatible with all software and doesn't slow down your computer at all.
    • 4. You pay USB Disk Security once and get it all, however, other antivirus products should be paid for updates every year.


  • USB Disk Security 5.0 Program Principles -

    • Prevention -

         Currently, USB storage is a common source of infection with potentially dangerous content, and malicious programs propagate so quickly that antivirus companies have to release updates as quickly as possible to minimize the amount of time that users will potentially be at risk. Unfortunately, many antivirus companies are unable to do this - users often receive updates once they are already infected. Our new technology blocks threats based on proactive protection and our solution can protect your computer against all threats trying to attack your computer via USB drive, no matter malicious programs are known or unknown.


    • USBShield -


         USBShield monitors in real time and protects your computer against all threats that can take over your computer via USB drive. It blocks threats based on innovative proactive technology and requires no signature updates at all.


    • USBScan -


         USBScan uses heuristic analyzer to scan USB drive and checks for potential malicious behavior. Heuristic methods eliminates false positives and significantly increases detection rates for new and unknown malicious programs. Files detected as suspicious are potentially unsafe.


    • MemoryShield -


         MemoryShield can analyze, conclude and summarize the rules of virus behavior, furthermore, integrated with the experiences of defining the virus by the antivirus experts. It monitors memory of all executed applications in real time, and blocks malicious programs.


    • Quarantine -


         Suspect malware can be safely locked away in the quarantine. Here the malware is stored in an encrypted format so that it cannot function nor do any harm to your computer.


    • RepairSystem -


         Very often, several malicious programs change registry and stay in the temporary internet directory. RepairSystem can restore malicious changes on your computer and delete unnecessary files and malicious programs that stay in the temporary internet directory.


    • Autostart -


         Most of the malicious programs add themselves automatically to the start-up registry entry. Autostart shows a list of applications that are executed during Windows system start-up. You can disable Autostart of the malicious program.


  • Download USB Disk Security :

    Website:    http://www.zbshareware.com

  • Contact and Support :


       If you encounter any problems in using of our software or have any suggestion, feel free to email us.

    Website:    http://www.zbshareware.com
    E-mail:      zbshareware@gmail.com

Disk Defragmentation

   Defrag Locates and consolidates fragmented boot files, data files, and folders on local volumes.

   To use Disk Defragmenter you might need to be logged on as an administrator or a member of the Administrators group in order to perform some tasks.

   Disk Defragmenter consolidates fragmented files and folders on your computer's hard disk, so that each occupies a single, contiguous space on the volume. As a result, your system can gain access to your files and folders and save new ones more efficiently. By consolidating your files and folders, Disk Defragmenter also consolidates the volume's free space, making it less likely that new files will be fragmented.

   You can also defragment disks from a command line using the defrag command.

   Open Disk Defragmenter.
  • Notes:
    • To open Disk Defragmenter, click Start, point to All Programs, point to Accessories, point to System Tools, and then click Disk Defragmenter.
      For information about using Disk Defragmenter, on the Action menu in Disk Defragmenter, click Help.

Using Commands:


Syntax:

defrag volume -
  • defrag volume [/a]

  • defrag volume [/a] [/v]

  • defrag volume [/v]

  • defrag volume [/f]
Parameters - volume: The drive letter or a mount point of the volume to be defragmented.
  • /a
    Analyzes the volume and displays a summary of the analysis report.

  • /v
    Displays the complete analysis and defragmentation reports.

       When used in combination with /a, displays only the analysis report. When used alone, displays both the analysis and defragmentation reports.

  • /f
    Forces defragmentation of the volume regardless of whether it needs to be defragmented.

  • /?
    Displays help at the command prompt.
Remarks:
  •    A volume must have at least 15% free space for defrag to completely and adequately defragment it. Defrag uses this space as a sorting area for file fragments. If a volume has less than 15% free space, defrag will only partially defragment it. To increase the free space on a volume, delete unneeded files or move them to another disk.
  •    You cannot defragment volumes that the file system has marked as dirty, which indicates possible corruption. You must run chkdsk on a dirty volume before you can defragment it. You can determine if a volume is dirty by using the fsutil dirty query command. For more information about chkdsk and fsutil dirty, see Related Topics.
  •    While defrag is analyzing and defragmenting a volume, it displays a blinking cursor. When defrag is finished analyzing and defragmenting the volume, it displays the analysis report, the defragmentation report, or both reports, and then exits to the command prompt.
  •    By default, defrag displays a summary of both the analysis and defragmentation reports if you do not specify the /a or /v parameters.
    You can send the reports to a text file by typing >filename.txt, where filename.txt is a file name you specify. For example:
    defrag volume /v >filename.txt

  •    To interrupt the defragmentation process, at the command line, press CTRL+C.

  •    Running the defrag command and Disk Defragmenter are mutually exclusive. If you are using Disk Defragmenter to defragment a volume and you run the defrag command at a command-line, the defrag command fails. Conversely, if you run the defrag command and open Disk Defragmenter, the defragmentation options in Disk Defragmenter are unavailable.

Tuesday, October 27, 2009

Keyboard Shortcuts in Windows XP

General Keyboard Shortcuts

Press Copy
CTRL+X Cut
CTRL+V Paste
CTRL+Z Undo
DELETE Delete
SHIFT+DELETE Delete selected item permanently without placing the item in the Recycle Bin
CTRL while dragging an item Copy selected item
CTRL+SHIFT while dragging an item Create shortcut to selected item
F2 Rename selected item
CTRL+RIGHT ARROW Move the insertion point to the beginning of the next word
CTRL+LEFT ARROW Move the insertion point to the beginning of the previous word
CTRL+DOWN ARROW Move the insertion point to the beginning of the next paragraph
CTRL+UP ARROW Move the insertion point to the beginning of the previous paragraph
CTRL+SHIFT with any of the arrow keys Highlight a block of text
SHIFT with any of the arrow keys Select more than one item in a window or on the desktop, or select text within a document
CTRL+A Select all
F3 Search for a file or folder
ALT+ENTER View properties for the selected item
ALT+F4 Close the active item, or quit the active program
ALT+Enter View properties for the selected item
ALT+SPACEBAR Opens the shortcut menu for the active window
CTRL+F4 Close the active document in programs that allow you to have multiple documents open simultaneously
ALT+TAB Switch between open items
ALT+ESC Cycle through items in the order they were opened
F6 Cycle through screen elements in a window or on the desktop
F4 Display the Address bar list in My Computer or Windows Explorer
SHIFT+F10 Display the shortcut menu for the selected item
ALT+SPACEBAR Display the System menu for the active window
CTRL+ESC Display the Start menu
ALT+Underlined letter in a menu name Display the corresponding menu
Underlined letter in a command name on an open menu Carry out the corresponding command
F10 Activate the menu bar in the active program
RIGHT ARROW Open the next menu to the right, or open a submenu
LEFT ARROW Open the next menu to the left, or close a submenu
F5 Refresh the active window
BACKSPACE View the folder one level up in My Computer or Windows Explorer
ESC Cancel the current task
SHIFT when you insert a CD into the CD-ROM drive Prevent the CD from automatically playing

Dialog box keyboard shortcuts

Press To
CTRL+TAB Move forward through tabs
CTRL+SHIFT+TAB Move backward through tabs
TAB Move forward through options
SHIFT+TAB Move backward through options
ALT+Underlined letter Carry out the corresponding command or select the corresponding option
ENTER Carry out the command for the active option or button
SPACEBAR Select or clear the check box if the active option is a check box
Arrow keys Select a button if the active option is a group of option buttons
F1 Display Help
F4 Display the items in the active list
BACKSPACE Open a folder one level up if a folder is selected in the Save As or Open dialog box

Natural keyboard shortcuts

You can use the keyboard shortcuts with a Microsoft Natural Keyboard or any other compatible keyboard that includes the Windows logo key and the Application key.

Windows Explorer keyboard shortcuts

Press To
END Display the bottom of the active window
HOME Display the top of the active window
NUM LOCK+ASTERISK on numeric keypad (*) Display all subfolders under the selected folder
NUM LOCK+PLUS SIGN on numeric keypad (+) Display the contents of the selected folder
NUM LOCK+MINUS SIGN on numeric keypad (-) Collapse the selected folder
LEFT ARROW Collapse current selection if it's expanded, or select parent folder
RIGHT ARROW Display current selection if it's collapsed, or select first subfolder

How To Register Internet Download Manager (IDM)


Registration of Internet Download Manager(IDM):


      Note that you stop using the trial version after 30 day trial period. If you want to continue using IDM, you must register to get full-featured IDM version.

You'll get the following advantages after the registration:
  • Additional features not available in the trial version (see below)
  • The license to use Internet Download Manager on one computer for any purpose
    prioritized technical support
  • FREE upgrade to all new versions of IDM during one year after the registration
  • you will support IDM development to make it even better
After the registration you'll get additional features (not available in the trial version):
  • No usage limitations
  • The management of site passwords
  • Delete all completed button enabled
  • Better utilization of available bandwidth
  • Built-in download logic optimizer
  • Download full-featured IDM version by odering online using secure forms, by phone or fax. All necessary information will be sent immediately after the purchase.

For Internet Download Manager Registration, just fill the form below:


Product home page - http://www.internetdownloadmanager.com


Registration/purchase page - http://www.internetdownloadmanager.com/purchase.html

Back to Top

Internet Download Manager (IDM)

      Internet Download Manager (IDM) is an easy to use tool to increase download speeds by up to 500 percent, resume and schedule downloads. According to the opinions of IDM users Internet Download Manager is a perfect accelerator program to download your favorite software, games, cd, dvd and mp3 music, movies, shareware and freeware programs much faster!

      Internet Download Manager has a built-in download logic accelerator that features intelligent dynamic file segmentation and safe multipart downloading technology to accelerate your downloads. Unlike other download accelerators and managers that segment files before downloading starts, Internet Download Manager segments downloaded files dynamically during download process. Internet Download Manager also reuses available connections without additional connect and login stages to achieve better acceleration performance.

      Comprehensive error recovery and resume capability will also restart broken or interrupted downloads due to lost connections, network problems, computer shutdowns, or unexpected power outages. Simple graphic user interface makes IDM user friendly and easy to use.

      Internet Download Manager has wide customization capabilities, downloadable skins, visual XP styles, multilingual interface, and supports proxy servers, FTP, HTTP and HTTPS protocols, firewalls, file redirects, cookies, directories with authorization, ZIP preview, categories, MP3 audio and MPEG video content processing and a large number of server platforms. IDM integrates seamlessly into Microsoft Internet Explorer, Netscape, AOL, MSN Explorer, Opera, and Mozilla browsers to automatically handle your downloads. You can also drag and drop files or use Internet Download Manager from command line. Internet Download Manager can dial your modem at the set time, download the files you want, then hang up or even shut down your computer when it's done.

      The site grabber feature of Internet Download Manager not only lets you download required files that are specified with filters, for example all pictures from a web site, or all audio files from a web site, but it also lets you download subsets of web sites, or complete web sites for mirroring or offline browsing. It's possible to schedule multiple grabber projects to run them once at a specified time, stop them at a specified time, or run periodically to synchronize changes.

      IDM checks for its new version once per week. Once it becomes available, IDM shows a dialog describing new features and suggests updating. You can also download the latest version of IDM using Quick Update tool.

      When IDM is working, it shows its pyramid icon on the taskbar. IDM menu pops up when you right click on IDM icon. You can exit IDM by picking "exit" in this menu.

Some Solutions to Download Problems with Internet Download Manager (IDM)


Frequently Asked Questions (FAQ):
    Q. I cannot download a file without using IDM. IDM download dialog always pops up even if I exit IDM. What should I do?
  • Ans - If you want to disable IDM temporarily for a single download, you may hold down the Alt key while clicking on a download link to prevent IDM from taking over the download. Note that holding the Alt key allows your browser download the file. You can customize this key by using Keys button in IDM Options->General. You may also delete this file type from “automatically start” list in "Options->General" dialog. Or you may add this site to the list of exceptions in the same dialog.

    Q. I want to disable downloading with IDM. How do I do this?
  • Ans - If you don't want IDM to take over any downloads from a browser, turn off the browser integration in IDM options. After turning off/on the browser integration in "IDM Options->General", don't forget to restart the browser.

    Q. Internet Download Manager doesn't take over the download from MSN Explorer. What is wrong?
  • Ans - Make sure that "Integrate into Microsoft Internet Explorer" box is checked in IDM Options->General. Also IDM icon should remain in the system tray if you want it to take over downloads from MSN Explorer or Internet Explorer based browsers.

    Q. Internet Download Manager doesn't take over a download. What is wrong?
  • Ans - IDM takes over a download if its type matches the list of types or extensions. You may edit the list of extensions in "IDM Options->General". If it doesn't help, try to hold down the CTRL key while clicking the download link.

    Q. My download speed in IDM is not very high. How can I improve it?
  • Ans - Please try to select a high bandwidth connection type in "Options->Connection" dialog. You may also try to play with "Default max conn. number parameter" in the same dialog. It should raise your speed. Please also note that the download speed strongly depends on the server you are downloading from and on your current network conditions.

    Q. I added a password for a site in “Options->Sites Logins” dialog, but IDM does not use it when I try to download from this site. What can I do?
  • Ans - Please check that you selected an appropriate protocol for your URL in "Options->Sites Logins" dialog. Please note that a download may have a different URL than the basic server. For example, you browse the site "http://www.mysite.com" but all its downloads come from "http://members.mysite.com". Please add the correct server name to site logins list. If it doesn’t solve your problem, try to use wildcards in URL like "*mystie.com".

    Q. IDM tries to download Windows updates. How to disable this?
  • Ans - Please try to set/add the following value for the exclude list in "Options->General" dialog: *.update.microsoft.com *download.windowsupdate.com

    Q. IDM downloaded a file but cannot rebuild temporary chunks. What should I do?
  • Ans - Usually this error occurs when a temporary file is being used by some other application. It may be some antiviral software or a file viewer. Please try to restart your computer, and then resume the download. In most cases, IDM will rebuild the temporary files. If it doesn’t help, please look for the download log file, and send it to us for analysis.

    Q. I get a memory allocation error when IDM tries to rebuild temporary chunks. What should I do?
  • Ans - Please update to the latest version. Please try to restart your computer, and resume the download. After that in most cases, IDM will rebuild all temporary files.

    Q. I have problems with downloading files from Rapidshare.com. IDM downloads HTML pages instead of real files. Is there any way to solve your problem?
  • Ans - Please try to go to Rapidshare.com, log into the Premium Zone and check the box for Direct Download. Our users who had similar problems reported that this helped them.

    Q. I have premium account on megaupload.com, but when I right click on a download link and choose "Download with IDM", IDM downloads an html page. How can I download files on megaupload.com with Internet Download Manager directly?
  • Ans - 
    • 1. Add new login information line for http://*megaupload.com to IDM Options->Site Logins. You should use the asterisk at the beginning of the site name because there are redirects to different sub domains on the site. Select "http://", type "*megaupload.com", your user name, and your password on the "Site login" Megaupload dialog.

    • 2. Turn on "Direct download" option in your account settings on megaupload.com site. You can do it on "Transfer settings" dialog. See picture.

         When direct download option is turned on, it's not necessary to download with IDM using "download with IDM" popup menu item in the browser. IDM should take over the download automatically when you click on its download link. If IDM has not taken over the download and a standard browser download dialog appeared, you should check the extension in the list of automatically downloaded file types in IDM "Options->File Types" dialog. For example you can come across files like filename.zip.001, filename.zip.002, and etc. In this case you should add 0* (zero followed by an asterisk) to the list of file types to start downloading automatically in Options->File Types.

Back to Top

Commands for Total Video Converter (TVC)

::  Commands for Total Video Converter  ::(TVC)


Command Line supports:

Command line option (only support for pro version:

/h or /help --- Help information

/f --- Input file

/ds --- Open file with system directx

/atds --- Auto open file with system directx

/o --- Output file

/tf --- From time Format hh:mm:ss.0.1s

/td --- Duration timeFormat hh:mm:ss.0.1s

/pi --- Output settings using ini filename

/pn --- Output settings using profile name in ini file


E.g.:

Convert test.3gp to VCD format testout.mpg

>tvc /f test.3gp /o testout.mpg /pi ini\palvcd.ini /pn PAL VCD mpeg Normal

Total Video Converter: Frequently Asked Questions

FAQ (Frequently Asked Questions):
    1. How to remove the watermark at the top left on the converted video files?
  •  You are required to register Total Video Converter before the watermark is removed.
          Total Video Converter is available for 15-day free trial only. Users who decide to continue using this program after the free period must purchase a license and register the software.


    2. How to have a trial of command line?

  •  Register the standard version and you will get the trial version of command line automatically.


    3. Why I can not open the wmv file with Total Video Converter?

  •  Total video converter can only support WMV8 version video format with internal video decoder. You must select the item 'Try to decode with MS DX9 Directshow first' in the window below.

Registration

How to register Total Video Converter?

  • Step 1:
    ·Plase run the Total Video Converter, If it is still a trial version, the application will pop-up a "Please Register Total Video Converter" dialog, Instructions to register by copying and pasting:


  • Step 2:
    ·COPY the registration code the registering info email with highlighting it with the mouse and pressing CTRL+C.

    ·PASTE the registration code to the edit box pressing CTRL+V in the register window box.


  • Step 3:
    ·Click the "OK" button.

Supported Format

Total Video Converter supports reading the following file formats:

  • Video Formats:

    · Real Video(.rmvb, .rm)

    · MPEG4(.mp4)

    · 3Gp(.3gp, 3g2)

    · MPEG1(.mpg, mpeg)

    · MPEG2 PS (.mpg, mpeg, vob)

    · MPEG2 TS (DVB Transport Stream)

    · Ms ASF(.asf, .wmv)

    · Ms AVI(.avi)

    · Macromedia Flash video FLV (.flv)

    · Real Video (rm)

    · Apple Quicktime(.mov)

    · FLIC format(.fli, .flc)

    · Gif Animation(.gif)

    · DV (.dv)

    · Matroska (.mkv)

    · ogm (.ogm)

    · Video Formats Dx9 Directshow can open


  • Audio Formats:

    · AAC(.aac)

    · Audio CD(.cda)

    · MPEG audio(.mp3, mp2)

    · Ms WAV(.wav)

    · Ms WMA(.wma)

    · Real Audio (.ra)

    · OGG(.ogg)

    · Amr audio(.amr)

    · AC3(.ac3)

    · SUN AU format (.au)

    · FLAC (.flac)

    · Macromedia Flash embedded audio(.swf)

    · Audio Formats Dx9 Directshow can open


  • Game Video Formats:

    · Technologies format, used in some games(.4xm)

    · Playstation STR

    · Id RoQ used in Quake III, Jedi Knight 2, other computer games

    · format used in various Interplay computer games,Interplay MVE

    · multimedia format used in Origin's Wing Commander III computer game,WC3 Movie

    · used in many Sega Saturn console games, Sega FILM/CPK

    · Multimedia formats used in Westwood Studios games, Westwood Studios VQA/AUD

    · Used in Quake II, Id Cinematic (.cin)

    · used in Sierra CD-ROM games, Sierra VMD

    · used in Sierra Online games, .sol files

    · Electronic Arts Multimedia, Matroska

    · used in various EA games; files have extensions like WVE and UV2

    · Nullsoft Video (NSV) format
Total Video Converter supports generating the following file formats:
  • Video Formats:

    · MPEG4(.mp4)

    · (.3gp, 3g2)

    · Game Psp(.psp)

    · iPod Video(.mp4)

    · MPEG1(.mpg, mpeg)

    · NTSC, PAL DVD mpeg

    · NTSC, PAL SVCD mpeg

    · NTSC, PAL VCD mpeg

    · Ms Mpeg4 AVI(.avi)

    · Divx AVI(.avi)

    · Xvid AVI(.avi)

    · H264 AVI(.avi)

    · Mjpeg AVI(.avi)

    · HuffYUV AVI(.avi)

    · Swf Video(.swf)

    · Flv Video (.flv)

    · Gif Animation(.gif)

    · Mpeg4 Mov(.mov)

    · Apple Quicktime(.mov)

    · FLIC format(.fli, .flc)

    · Gif Animation(.gif)

    · DV (.dv)

    · ASF (.ASF£©

    · Ericsson mobile

    · KODAK DC (.mov)

    · Samsung L55W (.mp4)

    · Casio Z600 (.avi)

    · WMV(for ZUNE,XBOX360)


  • Audio Formats:

    · MPEG audio(.mp3, mp2)

    · Ms WAV(.wav)

    · Ms WMA(.wma)

    · OGG(.ogg)

    · Amr audio(.amr)

    · Amr-WB (.awb)

    · AC3(.ac3)

    · SUN AU format (.au)

    · M4A(mp4 audio)

    · AAC(.aac)

    · FLAC(.flac)

    · Audio CD

    · Sun Au

    · MMF

Total Video Converter (TVC)

Total Video Converter:

  • Total Video Converter is a powerful and versatile video conversion software which supports playing, converting all kinds of video and audio formats files to be played in iPod, PSP, Zune, cellphone, PMP, PDA etc. Integrated, Media Burning tool burns the converted files to AUDIO CD, video DVD/SVCD/VCD.


  • Strongly recommended main features with particularly attractive characteristic:

    • l. Convert all kinds of videos to mobile videos or audio (mp4, 3gp, xvid, divx mpeg4 avi, amr audio) which are used by cellphone, PDA, PSP;

    • 2. Photos slide show combines multi-photos and music with more than 300 photos fantasy transition effect.

    • 3. Convert various videos to MPEG videos compatible with standard DVD/SVCD/VCD;

    • 4. Rip DVD to any popular videos of all sorts;

    • 5. Extract audio from various of videos and convert which to all kinds of audio (mp3, ac3, ogg, wav, aac);

    • 6. Integrate a powerful media player--Total Video Player;

    • 7. RIP CD to audio of all sorts directly;

    • 8. Burn the converted audio files to Audio CD;

    • 9. Burn the converted video files to DVD/VCD/SVCD;

    • 10. High compatibility and high efficiency for Importing RMVB or RM video/audio;


System Requirements:

  • Minimum Requirements:
    • Operating System - WIN98/WINME/WINNT/WIN2000/WINXP

    • Processor - 800 MHz Pentium II or higher

    • Memory - 256M RAM

    • Graphics - Accelerated display
  • Recommended Requirements:
    • Operating System - WIN98/WINME/WINNT/WIN2000/WINXP

    • Processor - PIII 2G or higher

    • Memory - 256M RAM or higher

    • Graphics - Required Ms DirectX9

    • other requirements - Micromedia flash OCX

How to use Winrar

How to use WINRAR:


      The interface item "Toolbar" is placed below menus, but above the file list. Toolbar buttons duplicate items of the Commands menu (all items of this menu also have keyboard shortcuts). When WinRAR displays an archive contents, some buttons may be disabled, if corresponding archive management functions are not applicable to the archive. If you wish, you may choose buttons to display, remove buttons text or reduce buttons size using General settings dialog or clicking by the right mouse button on the toolbar.


      Below the toolbar buttons you will see the small "Up" button and the disks list. "Up" button changes the current folder to the parent. Disks list is needed to select the current disk or, for example, the network. You may open it either using mouse or pressing F4 key. It is possible to drag "Up" button and the disks list to the right corner of toolbar. Pressing Ctrl+D or clicking the small "Disk" icon on status bar can also be used to change the current disk.


      The list of files is located below the toolbar. It may show either the unpacked contents of the current folder or, if WinRAR is entered to an archive, archived files. These are so called file management and archive management modes. For each file the following parameters are shown: name, size, type and modification time. Archived files also have two additional parameters - packed size and CRC32. CRC32 is the special control sum calculated basing on file data and it may help to detect either two archived files are the same without unpacking them. Same files always have the same CRC32 value. All parameters are organized into columns. By clicking on the column title you may change the files sort order (a blue arrow drawn in the title shows sort direction). Also it is possible to change the width of columns by dragging the column title separators with a mouse. Several additional list options are available in the File list dialog.


      If an archived file is encrypted, its name is followed by an asterisk. If a file is continued in a next volume, its name is followed by "-->". If a file is continued from a previous volume, its name is followed by "<--". And if a file is continued both in a next and from a previous volume, its name is followed by "<->".


      Before processing files you need to select them in the list. In additionally to the standard Windows methods of selecting files WinRAR provides several more keys for this purpose: Space, Ins, "Gray +", "Gray -". More details will be found in the topic Selecting files.


      The following keys may be used to navigate in the file list. Backspace (BS) or Ctrl+PgUp or double-click on the folder with ".." name to go to the parent disk or archive folder. The same action will close an archive, if you are viewing the archive root folder. Press Enter or Ctrl+PgDn or double-click on any other folder to enter to it. The same action applied to an archive name will open this archive. Ctrl+\ sets the root disk folder as the current.


      If you press the right mouse button in the files list, the menu containing file management and interface commands will appear. These commands are also accessible in the usual WinRAR menus, toolbar and keyboard, so you may select whichever activation method is most convenient for you.


      Left pane of WinRAR window can contain the folder tree panel if it is enabled in "Folder tree" submenu of Options. Folder tree is convenient if you need to navigate in disk or archive folders quickly. You may change the width of folder tree by dragging its right border with the mouse.


      Depending upon the "Show archive comment" option in General settings dialog and the presence of a comment in the opened archive, the right part of the file list may be overlapped by the archive comment window. You may change the width of the comment window by dragging its left border with the mouse.

Firefox Shortcuts


Active Firefox Windows & Tabs

Close Tab Ctrl+W
Ctrl+F4
Close Window Ctrl+Shift+W
Alt+F4
Move Tab Left
(when tab is focused)
Ctrl+Left Arrow
Ctrl+Up Arrow
Move Tab Right
(when tab is focused)
Ctrl+Right Arrow
Ctrl+Down Arrow
Move Tab to Beginning
(when tab is focused)
Ctrl+Home
Move Tab to End
(when tab is focused)
Ctrl+End
New Tab Ctrl+T
New Window Ctrl+N
Next Tab Ctrl+Tab
Ctrl+Page Down
Open Address in New Tab
(from Location Bar or Search Bar)
Alt+Enter
Previous Tab Ctrl+Shift+Tab
Ctrl+Page Up
Undo Close Tab Ctrl+Shift+T
Select Tab (1 to 8) Ctrl+(1 to 8)
Select Last Tab Ctrl+9

Access Tools in Firefox

Bookmark All Tabs Ctrl+Shift+D
Bookmark The Pages Ctrl+D
Bookmarks Ctrl+B
Ctrl+I
Downloads Ctrl+J
History Ctrl+H
Error Console Ctrl+Shift+J

Security Issues

Clear Private Data Ctrl+Shift+Del

Search Options

Find Ctrl+F
Find Again F3
Ctrl+G
Find As You Type Link '
Find As You Type Text /
Find Previous Shift+F3
Web Search Ctrl+K
Ctrl+E

Editing Related Topics

Copy Ctrl+C
Cut Ctrl+X
Delete Delete
Paste Ctrl+V
Redo Ctrl+Y
Select All Ctrl+A
Undo Ctrl+Z

Shortcuts related to the Current Page

Go to Bottom of Page End
Go to Top of Page Home
Move to Next Frame F6
Move to Previous Frame Shift+F6
Page Info Ctrl+I
Page Source Ctrl+U
Print Ctrl+P
Save Page As Ctrl+S
Zoom In Ctrl++
Zoom Out Ctrl+-
Zoom Reset Ctrl+0

Miscellaneous topics

Complete .com Address Ctrl+Enter
Complete .net Address Shift+Enter
Complete .org Address Ctrl+Shift+Enter
Delete Selected Autocomplete Entry Del
Toggle Full Screen F11
Help F1
Select Location Bar Alt+D
F6
Ctrl+L
Select or Manage Search Engines
(when Search Bar is focused)

Alt+Up Arrow
Alt+Down Arrow
F4

Purchase and Registration

Purchase and Registration:
  • Why register?
    This software is shareware and is supported by your registrations. Your support will help us create even better and easier-to-use software. Plus, registered users are entitled to free technical support and lifetime free update!


    Buy Now
  • Limitation before you registration :
    Before registration, you can split 15 files.


  • Purchase a code.
    Launch your browser and go to http://www.cd-to-mp3-converter.com . Once there, click on the Purchase link and follow the online instructions. Or click the buy link on our software. Or click the link below:


  • How to register?
    To register, active the registration windows and then input the registration name and code EXACTLY as what we have sent you. The register info will be sent as 'Register Name: ### Register Code: ###'. Please try to copy the register info instead of typing it one by one letter, for it is difficult to identify letter 'l' from number '1' and identify letter 'o' from number '0'. After doing that, press 'Register' button then a message will appear to inform you that you have successfully registered. You are now a registered owner of MP3 Cutter Joiner!

  • Lost registration code policy:
    If you registered and, for whatever reason, have lost the register info, simply email to support@cd-to-mp3-converter.com and we will resend your code as soon as possible. Remember to tell us your order ID.

MP3 Cutter - Joiner : Frequently Asked Questions

Frequently Asked Questions (FAQ):
    1.Q) My created WMA file is invalid, why?
  • If you create invalid wma files, please download wmfdist.exe and install it on your computer, then reinstall our software.


    2.Q) While attempting to edit a WMA file, the software does not seem to respond. What could be the problem?

  • Unfortunately, a major inconvenience with the WMA file at present is that many files are protected, or locked. As far as we know, protected WMA files cannot be converted with any software. Some WMA files are intentionally protected, while others are automatically protected upon creation by the producing software.


    3.Q) When I create MP3/OGG file, an error " Don't support this MP3/OGG format, please reset. " appear, why?

  • It is because you have set high frequency and low bitrate or have set low frequency and high bitrate. For example, you have set to frequency 48KHz, bitrate 32Kbps. If so, please low the frequency or high the bitrate.


    4.Q) I want to create small file, how should I do?

  • To create small file, please low the parameters. But the low the parameters such as frequency and bitrate, the low the quality of your created file, though the small the file. In other words, the high the parameters, the high the quality of your created file, but the large the file.


    5.Q) I want to marge just a part of every file not whole file in to one large file, could MP3 Cutter Joiner do that?

  • Yes, MP3 Cutter Joiner can do that in just one commmand. Just add the files you want to marge and set start-time/end-time for every file, then click "Join" button, all the parts not whole file you have chose will be marged to one large file. More info...


    6.Q) What is the update/upgrade policy?

  • ALL updates AND upgrades are free! MP3 Cutter Joiner supports unlimit update and upgrade.


    7.Q) I Lost Registration info Policy. What can I do?

  • If you have purchased and, for whatever reason, you lost the register info, simply email to support@audiotoolsfactory.com and we will resend you register info as soon as possible. Remember to tell us your order ID.


    8.Q) I have not received my registration info. Why?

  • Do not panic! In many cases, there may be a processing delay. Sometimes, people have supplied the wrong email address. In rare cases, the registered users are unreachable due to mis-configured email clients or privacy control. Please feel free email to support@audiotoolsfactory.com .


    9.Q) I have purchased a registration code and its not accepting it, why?

  • Please make sure you are using the correct register info. Our register info will be sent as 'Register Name: *** Register Code:*** '. Please try to copy our register info instead of typing it one by one letter, for it is difficult to identify letter 'l' from number '1' and identify letter 'o' from number '0'.


    10.Q) How can I send Feedback?

  • Any problem with MP3 Cutter Joiner, please feel free to support@audiotoolsfactory.com , Our support team will anwser you soon. Got an idea, suggestion or comment? Please email us at feedback@audiotoolsfactory.com Your suggestions are greatly appreciated!

MP3 Cutter - Joiner

Overview
  • Introduction:


        Do you want to cut and get out the excellent part in an audio file? Do you want to joining a lot of audio files into one file? Please test MP3 Cutter Joiner. It will be your best choice. MP3 Cutter Joiner can one time cut and get out many excellent parts in many audio files. It can also joining the excellent part in a lot of audio files together too. And you don't need to cut and get out the excellent parts first. MP3 Cutter Joiner supports and tests the function, enable you accurate settings new beginning of file, finish the position.MP3 Cutter Joiner adopts advanced LAME Encoder and OGG codec, allows you to generate various qualities of MP3, WAV, WMA and Ogg files. it offers rich options for your special requirements. Support MP3 VBR and OGG VBR. MP3 Cutter Joiner has the FLASH demo, very easily causes you to become the expert.

  • Features:
    1. Cuts small part from a large auido file.
    2. Marges multiple audio files to a large one.
    3. Supports visually setting start-time/end-time for cutting/joining. Can set the start-time/end-time just when pre-listening to the song.
    4. No quality is lost.
    5. Cutting/joining with high precision.
    6. Supports batch cutting.
    7. Supports MP3, WAV, WMA and OGG format.

IGRS

  •       In the future e-world, where various network terminals will be easily interconnected, resources and data may be transferred and shared freely, safe and quickly.

  •       Notebook computers, the carriers of both business information and personal information, are being increasingly used. This requires notebooks to be able to be easily and freely interconnected with other terminals besides their mobile computing functions. Lenovo' s IGRS AnyComm is designed aiming at this need.

  •       It is an IGRS-Protocol-based software for intelligent interconnection and resource sharing among IGRS users and among IGRS devices.
  • IGRS Users: No AP is necessary; Wireless interconnection;

  • IGRS Devices: Intelligent detecting; Connect-and-play;

  • IGRS Network: Information interchanging; Resource sharing.
  • With IGRS AnyComm, you may:
      1) at home, interconnect various home digital devices to enjoy integrated entertainment.
    • Quick AP-free interconnection, capable of quick wireless networking among multiple wireless devices.

    • Sharing and playing of multimedia resources between multiple wireless devices;

    • IGRS MediaLink breaks the limitation of a notebook audio/video effect. It plays video files onto large TV screen and plays audio files onto home hi-fi system;

    • Internet Sharing helps you easily enable simultaneous wireless Internet connection of multiple computers at home.

    • Viewing the pictures shot using mobile phone directly on TV screen;

    • l using mobile phone to control music that is being played by computer, without adjusting volume or switching songs in the vicinity of the computer;

      2) in conference room, interconnect conference participators, and quickly and easily transfer data and information.

    • With AnyComm, you are able to establish a wireless multi-participator conference room quickly.

    • Real-time information exchanging and real-time inter-transferring of data and files among the participators.

    • IGRS Wireless Projector enables wireless projection and helps improving conference efficiency, eliminating frequent plugs-pulls of cables.

    • By playing of notebook PPT file with an IGRS mobile phone, the presenter is able to exert his presentation skills.

    • User identity authentication and multiple-layer encryptions during data transmission secure confidentiality of wireless conferences.

      3) at outdoor, wireless interconnection with friends anywhere and anytime, instant information exchanging and wireless contest games.

    • Quick and easy wireless connection of multiple notebooks without restriction of site or device;

    • Real-time information/file interchanging.

    • Exchange of information (e.g. data, picture) with RIGS mobile phones;

    • LAN-game supporting enables wireless to-ground game-contest at any time.

Monday, October 26, 2009

Winrar: Frequently Asked Questions

Frequently Asked Questions (FAQ):
  • Q:    I still cannot understand how to use WinRAR to extract files.

    A:    Please read Shell and command line mode topic. It contains pointers to descriptions of several different ways to extract files.


  • Q:    When I download a RAR archive using Netscape Navigator or Communicator, the file is corrupt, what's wrong?
    A:    Apache HTTP server erroneously reports the RAR archive type as text/plain and as a result, Netscape Navigator/Communicator treats the file as plain text. To prevent this happening, those webmasters, who use Apache, should create .htaccess file in each directory which has RAR archives and add the following string to it:
    • AddType application/x-rar-compressed rar
            If .htaccess already exists, this string should be added to the already existing file.
  • Q:    RAR incorporates a number of different compression "methods", what are the advantages and disadvantages of using them and which one would you recommend for daily use?

    A:    I tried to answer to this question in the topic How to choose optimal archiving settings.


  • Q:    I've heard a lot about "Solid" archives. What are they and how can I use them?

    A:    Please see the topic Solid archives.


  • Q:    How could a user of my BBS (E-mail system, FTP server etc.) extract files from RAR archives while RAR is shareware and one must register after a 40 day evaluation period?

    A:    The RAR distribution archive contains a free UnRAR utility, UnRAR.EXE, which can be used, without paying a license fee, by anyone wanting to extract archives created by RAR. As an additional BONUS to this, the source code of a portable UnRAR is available on http://www.rarlab.com. Note that the RAR algorithm is proprietary and you must not use UnRAR sources to reverse engineer it.


  • Q:    Where can I get the latest releases of WinRAR?

    A:    Visit WinRAR home page http://www.rarlab.com.


  • Q:    I received "CRC error" message when extracting. What does it mean?

    A:    The extracted file is corrupt either because of archive damage or problems with hardware. If an archive is damaged, but has a recovery record, you may try to repair it, otherwise it is impossible to restore damaged data. Note that in the case of solid archive all files after a damaged file will be lost.


  • Q:    I failed to extract files from a solid multivolume RAR archive because one archive volume was damaged (bad floppy diskette). Help me!

    A:    First of all, you should use RAR recovery record when storing archives onto unreliable media such as floppies. Generally, it is not recommended to create solid archives in this case, use the normal (non solid) mode instead.
           If you have a damaged volume of solid archive, try to repair the damaged volume. It helps if RAR recovery was used when creating archive. You may check for the presence of a recovery record in the archive using Show information command. Rename recovered volume, fixed.arcname.rar (if recovery were not used, WinRAR builds only rebuilt.arcname.rar) to the actual volume name and try to unpack your archive again, starting from the first volume.


  • Q:    I forgot my password, please help me!

    A:    WinRAR encryption does not have any backdoor. Even if we forget a password to any our archive, we will not be able to restore it. So please do not ask us to help in this situation.


  • Q:    Why WinRAR does not delete its temporary files in the Windows temporary folder?

    A:    It happens when you use drag and drop to extract files or open archived files with an external viewer. In such case files may still be in use when closing WinRAR and moreover, there is no reliable way to detect if the external program still needs these unpacked files. So WinRAR does not delete them immediately, instead, when you run WinRAR the next time, all temporary files older than one hour will be deleted.

          If you do not want to involve the temporary folder when extracting files at all, use either "Extract To" command in WinRAR shell or "Extract To" item in the archive context menu instead of drag and drop.


  • Q:    Why WinRAR does not use 4096 K dictionary for my archive?

    A:    Even if you specified 4096 K dictionary size in the compression settings, WinRAR may automatically decrease this value when creating a new archive if the total archived data size is at least twice less than dictionary size. It does not hurt compression and allows to reduce memory requirements.

Protecting archives from damage in Winrar

::  Protecting archives from damage in Winrar  ::


  •          RAR archive format supports a special type of redundant information called a recovery record. If an archive has a recovery record, it can be repaired even in case of physical data damage due to floppy disk failure or data losses of any other kind. The ZIP archive format does not support a recovery record.
  •          To add a recovery record from the command line you may use switch -rr[N] together with any command, which creates or modifies an archive, or command "rr[N]" to add the recovery record to an existing archive. For example:

    WinRAR a -rr newarc *.txt
    WinRAR d -rr4 newarc dummy.txt
    WinRAR rr oldarc
  •          In WinRAR shell mode you may set "Put recovery record" option in Archive name and parameters dialog to add the recovery record to an archive. Another way is to set "Put recovery record" option in the default compression profile. In this case a recovery record will be added to archives after any archive modification.
  •          The recovery record contains up to 524288 recovery sectors. If data is damaged continuously, then each recovery sector is able to recover 512 bytes of damaged information. This value may be lower in cases of multiple damage.

  •          The number of sectors may be specified directly in the "rr[N]" command or "-rr[N]" switch (N = 1, 2 .. 524288). If it is not specified by the user, it will be selected automatically according to the archive size: a size of the recovery information will be about 1% of the total archive size, usually allowing the recovery of up to 0.6% of the total archive size of continuously damaged data.
  •          It is also possible to specify the recovery record size in percent to the archive size. In the command line mode just append the percent character to the command parameter. For example:

    winrar rr3% arcname
    In the shell mode you may set it either using Protect archive command or setting the recovery record size in the Advanced options of Archive name and parameters dialog.
  •          The recovery record increases the size of an archive. The size of the recovery record may be approximately determined by the formula:
    /256 + *512 bytes.
  •          To repair a corrupt archive, which has a recovery record, in WinRAR shell mode apply "Repair" command to it. In the command line use command "r". The repaired archive will have name fixed.arcname.rar, where 'arcname' is the original (damaged) archive name. If a corrupt archive does not contain a recovery record or if an archive is not completely recovered due to major damage, a second stage is performed. During this stage only the archive structure is reconstructed and it is impossible to recover files, which fail the CRC validation, but it is still possible to recover undamaged files, which were inaccessible due to the corrupt archive structure. This is useful only for non-solid archives. When the second stage is completed, the reconstructed archive will be saved as rebuilt.arcname.rar, where 'arcname' is the original archive name.

Saturday, October 24, 2009

Quick Screenshot Maker : Install-Uninstall

Overview - How to install and uninstall Quick Screenshot Maker :

Installation -

To Install Quick Screenshot Maker from CD-ROM :

Put the Quick Screenshot Maker CD-ROM disk into the drive. The Quick Screenshot Maker installer starts automatically.
NOTE: If the installer does not start, run the screenshotmaker.exe file on the CD-ROM.
Follow the instructions on the installation wizard.
To Install Quick Screenshot Maker from a Downloaded File

Find the file you downloaded and double-click it to begin installation.
Follow the instructions on the installation wizard.


Uninstallation -

Uninstall from your Windows Control Panel, Add/Remove Programs :

Click the [Start] button.
Select Settings > Control Panel.
Double-click Add/Remove Programs.
Click Install/Uninstall. Then select Quick Screenshot Maker from the list of programs that can be automatically removed.
Click the [Remove...] button to uninstall Quick Screenshot Maker.


Run Uninstall from the Quick Screenshot Maker program menu :

Click the [Start] button.
Select Program Files > Quick Screenshot Maker > Uninstall to uninstall Quick Screenshot Maker.