Softsystemware: 07/01/2010 - 08/01/2010

Friday, July 30, 2010

How to delete the recent history in Microsoft Windows XP


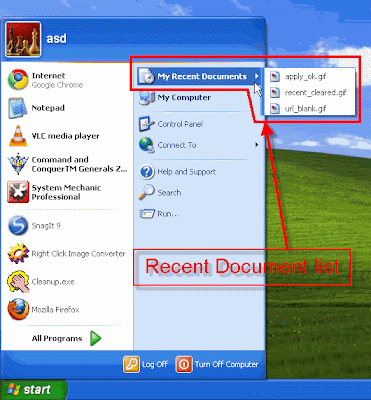
Recent history in Microsoft XP helps us to navigate the files and/or folders in a easy and quick way. It is nothing but the list containing the shortcuts of your recently opened files and folders. But it sometimes creates problems when we access any of our important or hidden documents and the shortcut of that document be placed in the "My Recent Document" link in the Start Menu.

Here is a demonstration to delete the recent history in Microsoft XP with screenshots to help you to do the right thing. There are two ways to clear the recent document list. The procedures are as follows.

Procedure 1:

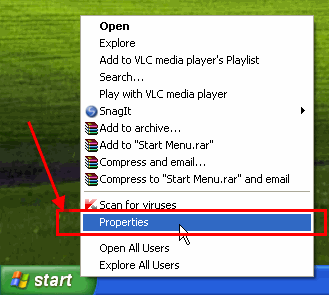
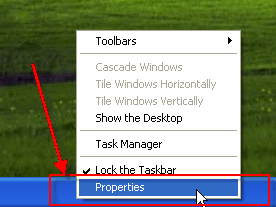
  • Step 1: Right click on "start" menu. Then click on "Properties".


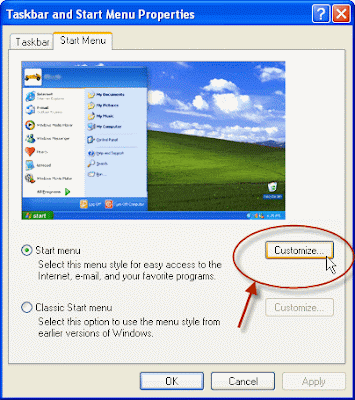
  • Step 2: Now click on the button "Customize".


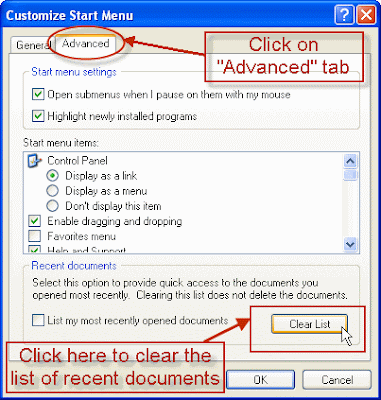
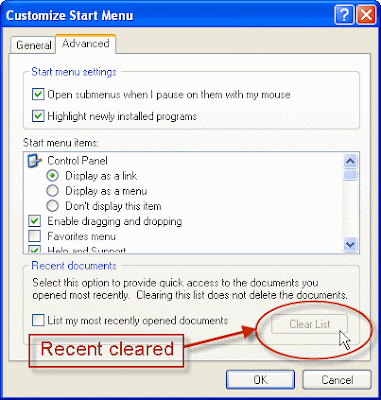
  • Step 3: Go to "Advanced" tab. Then click on "Clear List" button.


  • Step 4: When you are done, you can see "Clear List" button inactive, like the following screenshot.


  • Now click "OK", then "Apply" and again "OK". All the windows will be closed and you have done the job.

[N.B.: You can also right click on any other empty places on taskbar. If you do so, then click on "Properties", then go to "Start Menu" tab. Then follow from Step 2 onwards to clear your recent document.]

Procedure 2:

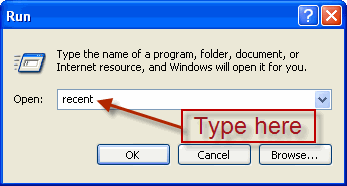
  • Step 1: Holding windows button press R, i.e., press Windows+R (or click on "start", then "Run").

  • Step 2: Type "recent" (without the quotes) as the command.


  • Step 3: Click "OK" or press "Enter" button on keyboard.

  • Step 4: The system folder "My Recent Documents" will appear.

    Now you can delete the shortcuts of your recently opened documents whichever you want. You can also delete all the shortcuts.

  • Step 5: Close the window.


Warning and precautions: If you have unhide the operating system files and/or the hidden files, then be aware about the operating system files before deleting all the documents. If you cannot delete any shortcut, then leave it and try to do with the others. Procedure 1 does not have any threat and thats why I think the it is the most secure way for any user.

How to import bookmarks or other data from other web browsers to Google Chrome

I have started to use Google Chrome just a few months ago. I used it for a some days and then set it as my default web browser. But there was a lot of problems for me. A new software, a new interface, new kind of settings... A problem to set default home page in Google Chrome has described to you earlier. Anther problem was my saved passwords. Later I solved this by importing the required data from the other web browser(s).

There are some easy steps to import data from other web browsers. Just follow one by one and get it ready in Google Chrome.

  • Step 1: Run your Google Chrome.

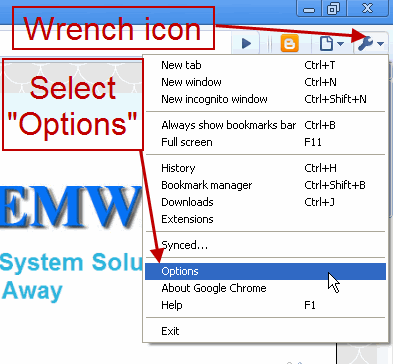
  • Step 2: Click on the wrench icon in the top-right corner of Chrome window.


  • Step 3: Click on "Options".

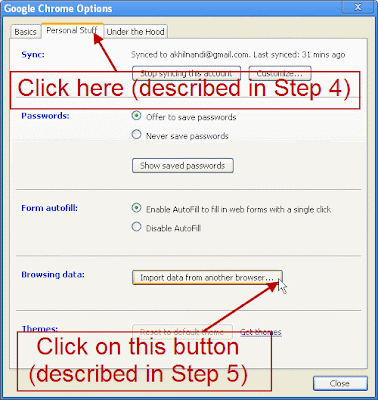
  • Step 4: A small window will appear having title "Google Chrome Options". Go to "Personal Stuff" tab.


  • Step 5: Click on the button "Import data from another browser..." in "Browsing data" section.

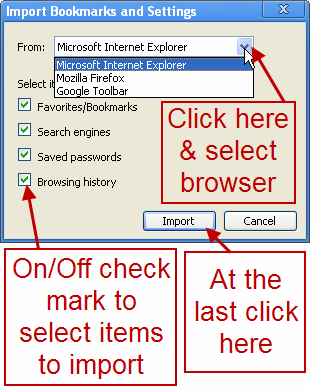
  • Step 6: Click on the arrow head (as shown in the following figure) beside "From" and then select any one name of the web browsers from which you wish to import your data.

  • Step 7: Put check mark on or off in the boxes to select items to import.


  • Step 8: Click on "Import" button.


That's all to import data from other web browser(s) to Google Chrome. Though in the screenshots I imported data from Microsoft Internet Explorer, you can select any of your web browsers (all the browsers installed in your system will be listed) at a time. Any time you can import data from another browser to Chrome.

Wednesday, July 28, 2010

How to erase your temporary files in Windows XP

We all suffers from a common problem of being low free space of Hard Disc Drive. The problem appears seriously if your operating system is installed on that drive because the drive, on which your operating system is installed, requires more free spaces for allocating "Page Files" onto Hard Disc.

The reasons behind the shortage of spaces are of different types such as saving your documents in "My Documents" or storing songs in "My Musics" etc. Another reason may be some different type and I am going to describe this kind of problem.

Whenever we install any kind of software or update any software including Operating System, some Files and/or Folders are created and stored in "temp" folder in system folder. These Files/Folders become unnecessary after the installation or update(s). We can delete it. Moreover we can delete the unnecessary and burdened Files and/or Folders in Windows XP without the help of any software. But before this we need to know where and how we will get the "temp" folder.

The process is little bit easy. I have attached some screenshots to guide you. The steps are as follows:

  • Step 1: Click on "start" button.


  • Step 2: Then click on "Run".
    You can also make the Steps 1 and 2 by pressing "Windows button+R" simultaneously.

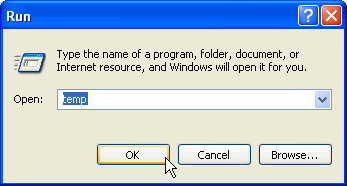
  • Step 3: A small window, named "Run" will appear.

  • Step 4: Type "temp" [without quotes] in the space provided.


  • Step 5: Now click on "Ok" button otherwise you can also press the "Enter" button.

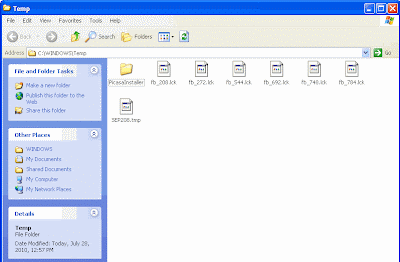
  • Step 6: Now a window, named "Temp" will appear. This is the required folder.


  • Step 7: Select the Files and/or Folders which you need to delete and then delete.

Tuesday, July 27, 2010

How to set Home Page in Mozilla Firefox in Windows XP


The default Home Page in Mozilla Firefox in Windows XP is:
http://en-US.start3.mozilla.com/firefox?client=firefox-a&rls=org.mozilla:en-US:official.

You can change the Windows default Home Page in Firefox. There are easy steps to set Home Page in Mozilla Firefox in Windows XP. The steps are below with some screenshots to guide you in the right way.

  • Step 1: Run Mozilla Firefox.

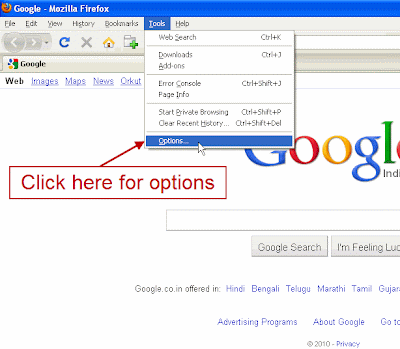
  • Step 2: Then click on "Tools" in the toolbar in Firefox window.


  • Step 3: Click on "Options".

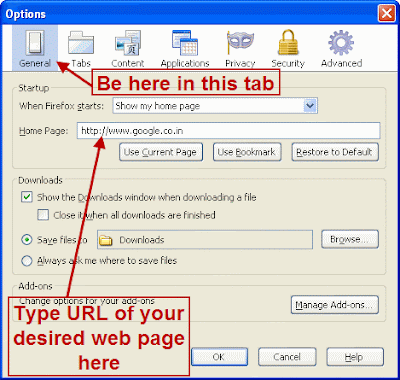
  • Step 4: Select "General" tab.


  • Step 5: In the "Startup" section, write URL of the website (as example: http://www.google.co.in) in the text field beside the option "Home Page".

Wednesday, July 21, 2010

How to set Home Page in Google Chrome


While using different web browsers, I have faced a problem about the home page earlier. I had no idea about it and also the settings. Later I used many of the web browsers and here I am going to discuss about the settings in Google Chrome web browser. It may be so much easy to set home page in google chrome to Advanced Users but I think this article may be helpful to all the people.

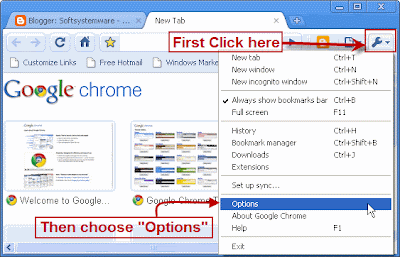
To set home page in Google Chrome first run the application. Then find the wrench icon in the upper - right side in the window of the application. The following figure will help you to find it.
Now click on it and choose "Options" from the drop-down list.


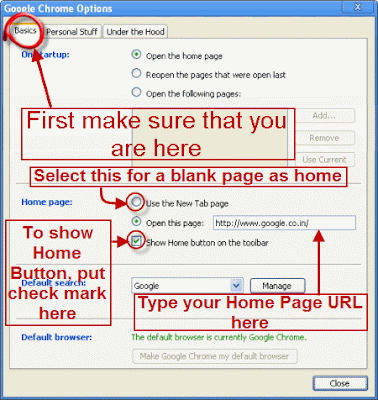
Now a small pop-up window will appear and looks like the following figure.
Here first of all make sure that you are in "Basics" tab.Next in the "Home page" section select the radio button before the option "Open this page" and write the address of the website which you want as your home page in Google Chrome. Remember, you have to write the complete url of the web site. As an example, I set it as Google and I put the url as http://www.google.com (You can also make a blank page for your home page. It is also so simple. Select the radio button before the option "Use the New Tab page").

Just below this option you can find another option, "Show Home button on the toolbar". As it's name refers, if it is checked then you can see the Home button in Google Chrome Toolbar. The following figure will guide you to make it properly.

Wednesday, July 14, 2010

How to change your image file extension

Almost every Image processing software supports the feature to change your image file extension (or image file extension). To convert your image into another specific image format you have to run the corresponding software and open the image and save as the image in your required format.

Here I am going to describe you a software to change the file format of a image with only two left clicks! The software Right Click Image Converter, as it's name refers, requires one right click and a left click to convert an image format!

  • The fastest way to convert between image formats :
    Select the files you wish to convert, right click, choose format and your're done! That's how simple it is to use Right Click Image converter. This utility will let you convert between image formats from the Windows shell. Advanced options are available if you wish to fine tune the conversion.

  • Convert from any of these :
    BMP, JPEG, GIF, ICO, PNG, TGA, TIFF, WBMP, PSD, CUT, IFF, DDS, PBM, PCX, PGM, PPM, RAS, XMB, XPM

  • Into any of these :
    JPEG, ICON, BMP, PNG, TGA, WBMP, TIFF, XPM, PBM, PGM, PPM

  • What can Right Click Image Converter do for you?

    • Convert images in just two clicks from Windows Explorer

    • Turn any image into an icon

    • Compress large BMP files into smaller JPEG or PNG files

    • Convert images into Wireless BMPs

    • Convert groups of files

    • Use command-line parameters


  • Right Click Image Converter is a product from Kristanix Software. The limited trial version of Right Click Image Converter is fully functional, but you are limited to converting 40 images. You can purchase the full version of the program for only $14.95. You can order Right Click Image Converter using your credit card, telephone, fax, wire transfer or regular mail.


  • Supported File Formats :

  • When converting to certain formats, such as JPEG, ICO and WBMP, the image may be changed (IE. number of colors may decrease, or in case of icons, the size will be limited to 128x128 pixels). This happens because there are some specifications of the file formats. The following specifications exist:
    • JPEG - Images must be between 8bit and 24bit colors.

    • WBMP - Images must be monochrome (IE. black and white) 1bit colors.

    • ICO - Images must be 128x128 pixels in size.

    • XMP - Images must be 8bit color (256 colors).

    • GIF - Images must be 8bit color (256 colors).

    • TGA - Images must be at least 8bit colors.

    • PPM, PGM, PBM - Images can be no more than 24bit colors.

    • TIFF - There are some problems when converting from TIFF images that is using version 6.0 encoding. These can usually not be converted.


  • You do not need to worry about these specifications, the program will convert the images and fix the problems, if any, for you. It is important, however, to be aware of these specifications, since once an image has been converted to, say, a monochrome black and white image, it is not possible to convert it back into colors again. Likewise, converting a PNG image into a JPEG image may decrease the quality of the image permanently. Note that the program will never overwrite the original file, but instead create a new one. So as long as you do not delete the original files, you will have a chance to go back to the original.

How to set a schedule download with Internet Download Manager (IDM)


Internet Download Manager (IDM) is a strong tool for downloading documents, videos, audio files and everything not only in the sense of increasing the speed of download but also for it's feature to set schedule for your download. It's possible to schedule exploring/downloading time or synchronization time for every project.

  • If you choose "One-time exploring/downloading" option then it will be possible (a) only to explore a site to look for matching files, or (b) to explore a site and download all matched files, or (c) to download checked files.

  • Please note that if you need to download several files from a site that has frequent problems with downloading, it's better to add required files to IDM main list and download these files using "Start Queue" button in IDM main window. In this case IDM will retry to start downloading files infinitely. But when you are downloading in the grabber, the grabber makes only 2 attempts to start downloading, after it stops supposing it did everything possible for the project.

  • You can schedule periodic synchronization for a site or for checked files by turning on "Periodic synchronization" option. In this case the grabber checks if files have been changed, and if changed, it will download new files and replace them on new ones. For periodic synchronization, the scheduler will turn on "overwrite existing files" option in project settings on step 2 of the grabber wizard.

  • The project will start at a specified day and time only if "Start download at" box is checked. The project itself should be closed, or if it's opened, it should be opened in the Main Action Dialog and it should be stopped. A running project, or a project opened on any stage of the wizard will not be run by the scheduler.

  • If you choose "Periodic synchronization" it will be possible to start the project many times in every predefined number of minutes/hours. The scheduler will run the project periodically until the time specified in "Stop download at", or if it's not specified then until the end of the day.

  • It's possible to stop any project at a specified time if you check "Stop download at" box and specify a time. Note that the project will stop independently of "Start download at" checkbox state.

  • After processing a grabber project you can program the grabber to hang up modem, exit Internet Download Manager, or turn off computer like in the main IDM scheduler. But in the grabber scheduler you can also open a file or run a program after processing a grabber project. If you want to run several files on completion of a grabber task, you can create a batch .bat file and specify it in "Open the following file when done". Please note that after finishing a scheduled project, IDM will wait for 10 seconds and then start to execute actions planned on completion.

Back to Top

How to Download with IDM (Internet Download Manager)


Internet Download Manager (IDM) is a very powerful tool to increase the rate of your download and also very helpful to make your download resumable (if domain support).

There are several ways to start your downloads with Internet Download Manager:

  1. IDM monitors clicks in Internet Explorer, MSN Explorer, AOL, Opera, Mozilla, Netscape, and many other browsers.
    This method is the easiest one. If you click on a download link in Internet Explorer or in another browser IDM will take over and accelerate this download. In this case you don't need to do anything special, just browse the Internet as you usually do. IDM takes over a download from Internet Explorer if its type matches the list of types/extensions. The list of file types/extensions to download with IDM can be edited in Options->General.

    If you click on Download Later button, URL (web address) will be added to the list of downloads, but the download process doesn't start. If you click on Start Download button, IDM will start downloading the file immediately. IDM lets you associate your downloads with IDM categories. IDM suggests the category and the default download directory according to file type. You may edit categories, delete and add new categories in the main IDM window. If you want to see the contents of a zip file before downloading, you may click on Preview button.
    IDM will take over any download if you hold down the CTRL key while clicking its download link in Internet Explorer. (you should check "Use CTRL key with IE click monitoring" box in "IDM Options->General").

    If you hold down the ALT key while clicking on a download link in IE, IDM will not take over the download and let Internet Explorer download the file. (you should check "Use ALT key with IE click monitoring" box in "IDM Options->General")

    If you don't want IDM to take over any downloads from a browser, turn off the browser integration in IDM options. After turning off or on the browser integration in "IDM Options->General", don't forget to restart the browser.

    Remember if Internet Download Manager had problems downloading file, you should press Alt while clicking on a link to let the browser process the download.

  2. IDM monitors clipboard for valid URLs (web addresses).
    IDM monitors system clipboard for URLs with special extension types. When a web address is being copied to the clipboard, IDM shows its dialog to start Download.

    If you click on OK button, IDM will start downloading.

  3. IDM integrates into right click link menu of IE based (MSN, AOL, Avant) and Mozilla based (Firefox, Netscape) browsers
    If you right click on a link in a browser, you will see "Download with IDM" menu item. You can download a specific link or all links in the selected text from an html page.

    This way of downloading files is useful if IDM couldn't take over the download automatically. Just pick this item to start downloading a link with IDM. You may also select a text in Internet Explorer, and pick "Download with IDM" to add all links in the selected text to IDM.

  4. You can add URL (web address) manually with Add URL button.
    See Main Dialog topic for more details

  5. Drag and Drop links from Internet Explorer to IDM main window or download basket
    Drop target is a window that accepts hyperlinks dragged from Internet Explorer, Netscape or Opera browsers. You can drag a link from your browser and drop it to this window in order to start your downloads with IDM.

    If you want to hide this window simply close it. Later you can pick "Url-> Show drop target" from the main menu (or tray menu) if you want this window to appear again.


  6. 6) You may start downloads from command line using command line parameters.

    You may start IDM from the command line using the following parameters:

    idman /s
    or idman /d URL [/p local_path] [/f local_file_name] [/q] [/h] [/n] [/a]

    Parameters:
    /d URL - downloads a file, eg.
    IDMan.exe /d "http://www.internetdownloadmanager.com/path/File Name.zip"
    /s - starts queue in scheduler
    /p local_path - defines the local path where to save the file
    /f local_file_name - defines the local file name to save the file
    /q - IDM will exit after the successful downloading. This parameter works only for the first copy
    /h - IDM will hang up your connection after the successful downloading
    /n - turns on the silent mode when IDM doesn't ask any questions
    /a - add a file, specified with /d, to download queue, but don't start downloading

    Parameters /a, /h, /n, /q, /f local_file_name, /p local_path work only if you specified the file to download with /d URL

Back to Top

Monday, July 12, 2010

How to change the keyboard mode in Avro Keyboard

Avro Keyboard is a software to write in Bengali language wherever and whenever you want. Here is a discussion about the keyboard mode in it.

There are two ways to change the keyboard mode in Avro Keyboard:

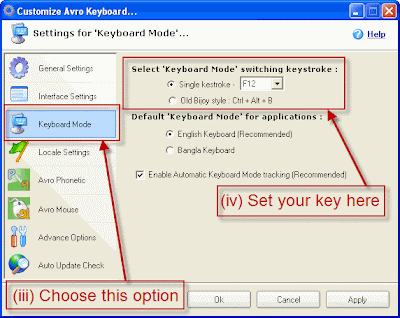
1. Using Keyboard : to change keyboard mode you can use default key F12. Press F12 to toggle the language. You can also change key as you want.

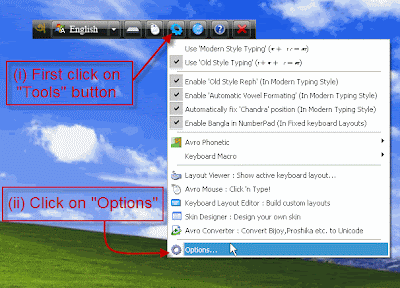
[N.B. : To change the default key F12, go through the instructions. The following figures will help you to change the default key for the Keyboard Mode change.


Run the application -> click on "Tools" option -> select "Options" -> go to "Keyboard Mode" in the left side panel -> set "Keyboard Mode switching keystroke".]

2. Using Mouse : You can use mouse to change the language used in Avro Keyboard in two ways.
(a) in Top Bar Interface : clicking on the keyboard mode button in the Top Bar Interface you can toggle the language.

(b) in System Tray Icon : clicking on System Tray icon Interface Mode you can toggole the language.

User Interface of Avro Keyboard

আমি বাংলায় লিখি।


We often face a common problem to write in our own language, whether it may be in text editor (like: MS Word, Notepad etc.) or in web (like: Google Chat, Gmail or other mailing services). I have found a way to solve it using "Avro Keyboard". Avro Keyboard is Uncode Compliant Free Bangla Typing Software.


Avro Keyboard was born in the 26th March, 2003 (The Independence Day of Bangladesh), bringing a new era in Bangla computing. It's flexible, gorgeous, feature rich, totally customizable, user friendly and already has a lot of typing automation tools that you have never imagined! Avro Keyboard offers much flexible user interface even for novice computer users in Windows.

Here are some key features of "Avro Keyboard Bangla Software":

· English to Bangla Phonetic Typing
· Traditional Keyboard Layout Based Typing
· Mouse Based Bangla Typing!

Others features includes:
· Input Language/Input Locale support
· Customizable Mode Switching (Single key/Key combination)
· Automatic Keyboard mode and Input Language Tracking
· Key Layout Viewer on the fly
· Keyboard Macro support
· Totally customizable

"Avro Keyboard" is a software by which you can write Bengali and/or English in one document. It supports two types of keyboard modes:

1. Bangla Keyboard: to write in Bengali

2. English Keyboard: to write in default language of your computer ( generally "English US")

(Remember: To write in Bangla, you must have activated the mode "Bangla Keyboard". See here "How to change the keyboard mode in Avro Keyboard".)

User Interface:

Avro Keyboard supports two types of user interface, as-
1. Top Bar
2. System Tray Icon

1. Top Bar Usr Interface :


If you will activate this mode, Avro Keyboard will be running in Tool Bar Window on the screen. This Bar becomes Semi-transparent in inactive situation so that you can see the window of the Avro Keyboard.


2. System Tray Icon Interface :

In the Top Bar mode you can access all the feature easily but if you want, you can run Avro Keyboard in System Tray Icon mode also.
Here all the options can be accessed in three ways:

  • One left click on the icon of the application will toggle the language mode.


  • Double click on the icon will make the application in the Top Bar Mode.

  • Right Click will bring the Avro Keyboard Menu.


[N.B.:

  • Avrokeyboard is a product of Omicron Lab. It is free to share, distribute. You can visit the website of the product.

  • To download the latest version of free Avro Keyboard from the publisher site, click here.]

Registration of Accurate Shutdown

  • Registration :

    • In order to use the software more than 30 days, you must register it . For more information please visit the website.

    • To purchase Accurate Shutdown visit http://www.accuratesolution.net

    • After purchasing you will receive a registration code via email.

    • Once you have received the user name and registation code, you can order Accurate Shutdown.

    • Registered users can enjoy free updates for one year. For sales issues, contact at sales@accuratesolution.net

    • To register the software, you are required to connect your computer to Internet , because the whole registration process is online. When your computer is connected to Internet, right-click the tray icon of Accurate Shutdown , from the main menu, click on "Register". You will be required to enter your user name and registration code, and after you submit them, you need to wait for a short while until a congratulation prompt is shown. Quit Accurate Shutdown and run it again. From now you can use all functions of Accurate Shutdown, and you will no longer see the registration reminder.

    • If you have any question or problem with the ordering process please send email to support@accuratesolution.net.


  • Technical Support :

    • As a registered user of Accurate Solution products, you will receive ongoing email support from our technical support team. If you have technical support needs,email at support@accuratesolution.net.


  • Feedback :

    • If you have any question or suggestion with the product you can send feedback by an email at feedback@accuratesolution.net.


  • Developer Information :

    • http://www.accuratesolution.net


Sunday, July 11, 2010

Frequently Asked Questions of Accurate Shutdown


There may be some problem(s) while using software like Accurate Shutdown and here, in the following, there are solutions of some common issues.

[N.B.:In case to use Accurate Shutdown, you can go through the "Quick Start Guide" or simply to know the product info you can go through the "Introduction of Accurate Shutdown". ]

█ I set a time for ASD to turn off my computer everyday, but my child turns it on again afterwards. Is it possible to keep the computer unavailable for a period of time after it is turned off?

► Certainly. ASD can help you keep the computer off for a specified time period after it is turned off by ASD. Here is the instruction:
1. Select Autorun at start and its first option:
The computer can't be turned on in ___hours___minutes after it is powered off by ASD
2.If you wish to keep it unavailable for a specified period of time everyday, please select Autorun at start and its second option:
The computer can't be turned on from __:__ to__:__(hh:mm)
Fill in the blanks, and click on the Start button.

Back to top

█ My child is hooked to the computer and spends too much time surfing on the Internet. I want him to go to bed on time and would like to automatically turn off the computer at 10 p.m every night. What should I do?

► ASD can help you. Here is what you can do:
1. Run ASD;
2. Select Execute at in Time Setting. Enter 22:00 and then select Everyday on the right;
3. Select Turn Off PC in Task Setting;
4. Select Autorun at startup;
5. Click the Start button. Now ASD is configured to switch off the computer at 22:00 every night.
6. Remember to set a password and keep it away from your child.

Back to top

█ I selected the option that the computer can't be turned on from 9:00 a.m. to 12:00 p.m. everyday. If I need to use the computer during this time one day, what should I do?

► Startup the computer and press F8 continuously before entering the operating system. Select Safe Mode of the Windows Advanced Options Menu on the screen, and set the system to run using Safe Mode. In Safe Mode, change the system clock to a time outside that of the specified period. Now you can start your computer normally and change your settings of ASD.

Back to top

█ I selected the option The computer can't be turned on 3 hours 0 minutes after it is powered off by ASD, but sometimes I have to use the computer in the time limit. What should I do?

► Turn on the computer and press F8 continuously before entering the operating system. Select Safe Mode from the Windows Advanced Options Menu on the screen, and set the system time out of the period limited by ASD under Safe Mode. Now you can start your computer and change your settings of ASD as you need.

Back to top

█ I am downloading files from Internet and it will be finished in about one and a half hours. If I have to go out now, how can I set the computer to be disconnected from the Internet automatically after the downloading is completed?

► 1. Run ASD, select Execute after in Time Setting, and fill in the blanks with 1 hours 30 minutes;
2. Select Disconnect Internet in Task Setting;
3. Click the Start button, and your computer will be disconnected withm the Internet after one and a half hours.

Back to top

█ I want my computer to execute a task at a certain time, such as using a TV Card device to watch TV, but I am afraid I would miss it. Can I let my computer run the task automatically at a specified time?

► Suppose today is October 1, 2003, and the program you want to watch starts at 20:45 tonight. Follow these steps:
1. Run ASD, select Execute at in Time Setting and enter 20:45 10-01-2003;
2. Select Open file in Task Setting;
3. Click the Select button on the right to select the TV device driver (or shortcut of this program);
4. Click the Run button on the right to test;
5. Click the Start button, and ASD will run the TV device program automatically at 20:45 this evening.

Back to top

█ I find ASD is very convenient to use. However, sometimes my colleagues change my settings. What should I do to preserve the settings?

► In this case, you need to set a password. Follow these steps:
1.Run ASD, and right-click its tray icon (at bottom-right of the screen);
2.Select Set Password from the main menu;
3.Enter and confirm a password then click OK;
From now on your password will be required for any change in settings of ASD. When you no longer need the password, you can remove it by clicking Cancel Password in the main menu.

Back to top

█ Sometimes I have to go out when the computer is executing a program, and I'm not sure when I will come back. I'd like to have the monitor turned off if I don't return after a period of time (10 minutes, for example). What should I do?

► 1. Run ASD, select Execute after system idle for __:__(hh:mm) in Time Setting, and enter 00:10
2. Select Turn Off Monitor in Task Setting
3. Click the Start button, and the monitor will be turned off in 10 minutes if no one moves the mouse or touches any buttons on the keyboard during this period.

Back to top

█ I am running a net bar. When some computers are idle, I have to turn them off by myself. It's troublesome. Can the computers be powered off automatically when they are idle for an hour?

► In this case, you must install ASD on each computer first and the do the following:
1. Run ASD. Select Execute after system idle for__:__(hh:mm), and enter 01:00 ;
2. Select Execute immediately when ASD is run;
2. Select Turn Off PC in Task Setting;
3. Select Autorun at startup;
4. Click the Start button, and your computers will be powered off automatically when their systems are idle for an hour.

Back to top

█ I am managing a server. To avoid mistakes and improve speed, I often have to reboot it at a specified time. It's troublesome. Can I have the server reboot automatically every 18 hours?

► Yes. Follow these steps:
1.Run ASD, select Execute after __hours__minutes, and fill in with 18 hours 0 minutes;
2.Select Execute immediately when ASD is run;
3.Select Restart PC in Task Setting;
4.Select Autorun at startup;
5.Click the Start button, and your server will reboot automatically every 18 hours.

Back to top

█ When I am not home and don't want others to turn on my computer in a certain period of time, what should I do?

► Suppose you don't want the computer be turned on from 11:00 to 18:00, you can do the following:
1. Run ASD . Select Autorun at startup in setting interface;
2. Select The computer can't be turned on from __:__ to __:__(hh:mm), fill in with 11:00 to 18:00;
3. Click the Start button.

Back to top

█ I set ASD to execute a task at a certain time, but ASD didn't do it. Why?

► Please make sure ASD has been run, and you can select Autorun at startup to be sure that ASD is always running.

Back to top

█ When I turn off my computer with ASD , the computer can't be powered off completely and it stops at You can turn off your computer safely. Why happened?

► In general, it could be one of these cases:
1.The hidden device APM/NT Legacy Mode hasn't been selected.
It is very likely that a computer can't be powered off automatically because the hidden device APM/NT Legacy Mode hasn't been selected. So check its status first: right-click My Computer icon on the desktop, select Properties, then Hardware, then Device Manager, click View and select show hidden devices. If your computer has this option, you will see a red X before APM/NT Legacy Mode. Select this function and you will solve the problem.
A helpful tip: you can clear some useless devices using show hidden devices. For example, some virtual devices created by the installation of some software related to system, such as some anti-virus software, CPU tool software and so on.
2A) The default power settings of the BIOS has been changed. It might cause the problem mentioned above. Restore the power settings of the BIOS to default value and the problem should be solved.
2B) Power Schemes doesn't work right. It rarely happens to computers with Windows XP, but it may happen to some old computers, especially those whose main boards do not support BIOS refreshing. This means that users can't update their computer to support Power Schemes. Some other users found their computers cannot be powered off correctly if they do not set never for Turn off monitor, Turn off hard disks, and System hibernates in Power Schemes.
2C) Check your computer's power supply system. You could solve the problem by simply replacing the old power adaptor.
2D) A user found his system could not be powered off automatically before he disabled the auto-run function of his CD-ROM.

Back to top

█ I selected Execute after System Idle, but sometimes ASD doesn't execute the predetermined task when no one has moved mouse or touched keyboards during the specified period of time. Why?

► Generally, it is because some memory resident programs have been loaded in the system. As a result, ASD does not consider the system idle. Reboot your computer and the problem will be solved.

Back to top

Quick Start Guide of Accurate Shutdown

For the quick start of Accurate Shutdown follow the tray icon of the program located at the bottom-right of the screen.

  • The tray icon is still appeared when ASD is idle. If you left-click the icon, the setting interface of ASD will appear on the screen (It doesn't work when ASD is working).

  • While ASD is working, its tray icon flashs.

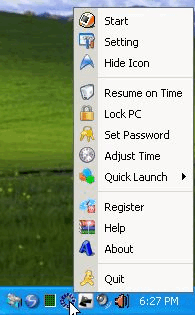
  • Right-click the tray icon, the main menu of ASD will appear.


It consists of:

  • Start: Click it to initiate the tasks and its tray icon will start blinking. If you right click the blinking icon, it will be replaced by Stop, and if Stop is clicked , the program will stop working right away.


  • Setting: If clicked , the settings interface will appear.


  • Hide Icon: This function can hide tray icon. Press "Ctrl + F11" to display that again.


  • Resume on Time: This will lead you to a tutorial which shows you how to set your computer to be turned on automatically at specified time.


  • Lock PC: The function can Lock your computer and avoid any unauthorized operation.


  • Set Password: Sets a password to prevent any unauthorized operation. Once you set a password, you will be required to enter it for any important operation. Furthermore, from now on Set Password is replaced by Cancel Password until you successfully carry out the Cancel Password operation. If you click on Cancel Password, your present password will be required.


  • Adjust time: Synchronizes your PC's time to atomic clock servers.


  • Quick Launch: Executes the "Turn Off PC/ Restart PC, Log Off/ Standby/ Hibernate/ Turn Off Monitor/ Disconnect Internet" quickly.


  • Register: To register your Accurate Shutdown online.

  • Note: After a successful registration, Register will be replaced by Accurate Shutdown, which takes you to our web site.

  • Help: Displays the help file for the software.


  • About: Displays the initial interface of the program. Clicks on the interface then it disappears.


  • Quit: Turns off ASD.

Accurate Shutdown : Introduction

Hallo friends,

Often it becomes a big problem to us to shut our computer system at a particular time in absence of us. So, I have found many ways to do this and now I am going to introduce you a software, name “Accurate ShutDown”. There are other softwares also (like: Quick ShutDown etc.).

ACCURATE Shutdown is a powerfully automatic software that automatically executes tasks at pre-defined time. It has many timer options to meet the user's requirements on different occasions. Specifically, it can automatically turn off/reboot/logoff/lock/ the computer, turn off the monitor only, disconnect from the Internet, and execute one or a group of programs.


System Requirements:

Accurate Shutdown requires the following minimum configurations to run:

  • Windows versions: Microsoft Windows 98 / Me / NT / 2000 / XP

  • Memory: 32 megabytes (MB) of RAM

  • Hard drive: 4 megabytes (MB) of hard drive space


Features:

  • Supports most operating systems: Windows 98 / Me / NT / 2000 / XP;

  • Turns the power off completely;

  • Executes specified programs at user-specified time;

  • Synchronizes your PC's time to atomic clock servers;

  • Various timer options to meet different needs;

  • Offers password protection for the system safety;

  • With a simple, compact,use-friendly interface that is easily mastered and used.

  • Keeps the computer/Internet unavailable in the specified time period everyday.


How to start Accurate Shutdown:
Now I am going to demonstrate the steps to start Accurate Shutdown as follows:

1. After completing the installation, Please double-click the software icon on the desktop to run the program;

2. The initial interface will appear in the center of the screen and you can see its tray icon;

3. After the software has been loaded, its setting interface appears in the center of the screen;


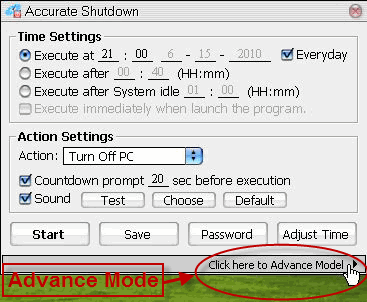
4. The setting interface is mainly comprised of two parts:

(i) Time Settings
(ii) Action Settings

5. Below the two parts are some other buttons for your choice:

When clicked on, it saves the above settings and lets teh program start working immediately.

When clicked on, it saves the above settings. Push Start to initiate the program.

Setting password protection.

Synchronizes your PC's time with atomic clock servers.

This button expands Advanced Settings Panel.

Back to Top